Stop compromising between airflow, aesthetics, and practicality—discover the precise engineering and design principles that transform a simple ceiling fan into the silent orchestrator of your home’s comfort.
Choosing a ceiling fan extends far beyond matching a finish to your decor. It’s a nuanced interplay of physics, spatial dynamics, human behavior, and environmental science. Install the wrong fan in a bedroom, and you may experience disruptive airflow that interferes with rest. Select an undersized model for a vaulted great room, and you create frustrating pockets of stagnant air while increasing energy demand. Opt for a non-rated fixture in a humid bathroom, and you risk premature corrosion and safety hazards. This guide dismantles decades of marketing noise and fragmented advice. Through the TRIAD Selection System—a framework built on Technical Precision, Room-Specific Dynamics, and Harmonious Integration—you’ll gain the clarity to match the exact right fan to every space in your home. Grounded in airflow engineering standards, architectural best practices, and established industry patterns, this resource delivers actionable guidance for making confident, informed decisions that enhance comfort, support energy efficiency, and elevate your living environment for years to come.
Introduction: Why “One Fan Fits All” Is a Costly Myth
Walk into any home improvement store, and you’ll encounter aisles of ceiling fans presented primarily as decorative items. Marketing materials emphasize blade finishes and light kit styles while critical specifications remain buried. This presentation fosters a persistent misconception: that ceiling fans are primarily aesthetic accessories. In reality, a ceiling fan is a precision air-moving appliance. Its performance directly impacts thermal comfort, humidity management, energy use, and even perceived room dimensions. The U.S. Department of Energy identifies properly selected and operated ceiling fans as a cost-effective strategy for reducing cooling-related energy use—but only when matched correctly to the space. A fan moving air inefficiently in a large room forces HVAC systems to work harder. An overly powerful fan in a small bedroom creates disruptive drafts. A fixture lacking appropriate moisture resistance in a steamy bathroom risks long-term damage.
Consider the physics: ceiling fans don’t lower air temperature. Instead, they create a wind-chill effect on human skin (enhancing evaporative cooling) and promote thermal stratification mixing—pushing warm air trapped near ceilings down into the living space during colder months. Effectiveness depends entirely on three variables: the fan’s airflow capacity (measured in CFM—cubic feet per minute), blade span relative to room dimensions, and mounting height relative to floor and ceiling architecture. Industry standards from organizations like ASHRAE (American Society of Heating, Refrigerating and Air-Conditioning Engineers) and AMCA (Air Movement and Control Association) provide foundational airflow guidelines. Yet these are rarely translated into room-specific, actionable advice for homeowners. This gap between technical standards and practical application is where frustration—and poor purchasing decisions—take root.
This guide bridges that gap. Moving beyond superficial checklists that rely solely on square footage, we provide a dynamic decision framework validated against spatial challenges, environmental factors, and human comfort patterns. You’ll understand why a 52-inch fan ideal for a standard bedroom becomes ineffective under 12-foot ceilings. You’ll learn how blade pitch interacts with motor torque to determine real-world airflow versus advertised claims. You’ll recognize why perceived “quietness” depends on bearing quality, blade balance, and installation precision—not just brand promises. By anchoring every recommendation in observable principles rather than opinion, this resource empowers you to evaluate any fan against your specific room’s non-negotiable requirements. The result is confidence at the point of purchase, optimized performance upon installation, and enduring satisfaction with a choice that serves both function and form.
The TRIAD Selection System: Engineering Comfort Through Three Interlocking Dimensions
Forget fragmented checklists. True ceiling fan mastery emerges when three critical dimensions align seamlessly: Technical Precision, Room Dynamics, and Aesthetic Integration. This isn’t a linear sequence but an interdependent system. Sacrifice one dimension, and the entire solution falters. A technically sound fan (high verified CFM, correct size) fails if its industrial aesthetic clashes with a serene bedroom. A beautifully styled fan becomes ineffective if mounted too low in a room with active children. A fan sized correctly for square footage underperforms in a space with unique airflow obstacles like open stairwells or vaulted ceilings. The TRIAD System ensures holistic alignment. Master these three pillars, and you’ll avoid the common regret of a mismatched fixture.
Dimension 1: Technical Precision – The Unseen Engine of Performance
Technical Precision forms the non-negotiable foundation. This dimension addresses the measurable, physics-based requirements that determine whether a fan can functionally serve the space. Ignoring these factors guarantees compromised performance, regardless of style or price.
Airflow Capacity (CFM) and Room Volume: Beyond Square Footage
Most generic guides recommend fan size based solely on room length and width. This is incomplete. Air moves in three dimensions. A 12×15 foot bedroom with standard 8-foot ceilings (1,440 cubic feet) has vastly different airflow needs than a 12×15 foot great room with a 20-foot vaulted ceiling (3,600 cubic feet). CFM requirements must account for total room volume. Industry benchmarks provide starting points:
– Small rooms (< 1,000 cu. ft.): 1,000–3,000 CFM
– Medium rooms (1,000–2,500 cu. ft.): 3,000–5,000 CFM
– Large rooms (2,500–4,000 cu. ft.): 5,000–8,000 CFM
– Very large/open spaces (> 4,000 cu. ft.): 8,000+ CFM (often requiring multiple fans)
However, advertised CFM ratings are frequently measured under ideal laboratory conditions. Real-world performance may vary due to blade design, motor limitations at lower speeds, and installation variables. Prioritize fans tested and certified by the AMCA. Look for the AMCA Certified Airflow seal—a third-party verification that the stated CFM is achievable in actual operation. For critical spaces like primary bedrooms or home offices where consistent airflow is essential, this verification adds valuable confidence.
Blade Span: The Geometry of Effective Air Circulation
Blade span (diameter) determines the coverage area of the downdraft column. Too small, and air only circulates directly beneath the fan, leaving perimeter areas stagnant. Too large, and airflow becomes turbulent near walls. The optimal span creates a gentle, consistent column of air that reaches floor level without disruptive vortexes.
The Coverage Circle Principle: Imagine a cone of air extending downward from the fan blades. At floor level, this cone should cover approximately 60–70% of the room’s floor area for balanced circulation. For a standard 12×12 foot bedroom (144 sq. ft.), a 44–52 inch span creates an ideal coverage circle of roughly 85–100 sq. ft. at floor level. In a narrow 10×20 foot dining room, a single 52-inch fan may leave ends of the table underserved; two 42-inch fans spaced strategically often provide superior coverage.
Critical Nuance: Blade Count and Pitch Matter More Than You Think
Marketing often suggests “more blades = more airflow.” This is not consistently true. Airflow depends primarily on blade pitch (angle) and motor torque, not blade count. Three-blade fans can move air efficiently due to reduced drag on the motor. However, four or five-blade designs may offer smoother, quieter operation due to better weight distribution—a consideration for bedrooms directly above living spaces. Blade pitch (typically 12–15 degrees) is crucial: too shallow (<10°), and air slips over blades inefficiently; too steep (>18°), and turbulence increases noise. Premium fans engineer pitch specifically for their motor’s torque curve. When comparing models, prioritize documented pitch angles and AMCA-certified CFM over blade count alone.
Mounting Solutions: Adapting to Your Ceiling’s Reality
Your ceiling’s architecture dictates the mounting hardware—not the other way around. Using the wrong mount compromises safety, performance, and noise levels.
- Standard Mount (Downrod Required): For flat ceilings 8–9 feet high. Requires a downrod to position blades 7–9 feet above the floor. Why it matters: Blades too close to the ceiling (<10 inches) create turbulent “ceiling wash,” reducing downward airflow efficiency. Blades too low (<7 feet) become a safety hazard and disrupt room traffic flow.
- Low-Profile / Hugger Mount: For ceilings under 8 feet. The motor housing sits flush or nearly flush against the ceiling. Critical trade-off: Hugger fans typically sacrifice some airflow efficiency. Without space above blades for air to gather, downdraft is weaker. Compensate by selecting a hugger model with a higher-torque motor and verified CFM rating. Never install a standard-mount fan with a short downrod on a low ceiling—it risks wobble and poor performance.
- Angled / Sloped Ceiling Mount: For vaulted or cathedral ceilings (slopes up to 30–45 degrees, depending on kit). Uses a specialized ball-and-socket joint. Non-negotiable: The downrod must be long enough to position blades horizontally (parallel to the floor), not parallel to the sloped ceiling. A fan tilted with the ceiling creates chaotic, ineffective airflow patterns. Always verify the maximum slope rating of the mounting kit matches your ceiling angle.
- Extended Downrods: For ceilings over 9 feet. Rule of thumb: Add approximately 6 inches of downrod length for every additional foot of ceiling height beyond 9 feet. For a 12-foot ceiling, an 18-inch downrod is typically appropriate. Consideration: In rooms with very high ceilings (14+ feet), dual-motor fans or strategic placement of two smaller fans may provide more balanced airflow than a single fan on an extremely long downrod.
Motor Quality: The Heartbeat of Longevity and Silence
The motor is the most critical unseen component. Two fans with identical blade spans and advertised CFM can deliver vastly different real-world experiences based on motor construction.
- AC Induction Motors: Traditional, robust, and generally less expensive. May produce a faint hum at lower speeds. Durability varies significantly by bearing quality (sealed double-ball bearings typically outperform sleeve bearings).
- DC Brushless Motors: Modern standard for premium performance. Use significantly less energy than equivalent AC motors, operate nearly silently (valuable for bedrooms, studies), offer finer speed control (often 6+ speeds vs. 3 for AC), and start/stop more smoothly. The higher initial investment is often justified by energy savings and superior user experience in noise-sensitive spaces.
- The Bearing Consideration: Before purchasing, research the specific model’s bearing type if possible. Sealed double-ball bearings handle weight and vibration more effectively than sleeve bearings, especially on sloped ceilings or with longer downrods. This impacts long-term noise levels and stability. Manufacturer specifications sometimes omit this detail—professional installer reviews or technical forums may offer insights.
The Fundamental Principle: Technical Precision transforms airflow from a random occurrence into a predictable, reliable outcome. When measurements, physics, and engineering align, comfort becomes inevitable—not accidental.
Dimension 2: Room Dynamics – Mapping Airflow to Human Experience
A fan doesn’t operate in isolation; it serves people within a specific environmental context. Room Dynamics addresses the unique functional demands, environmental conditions, and human behaviors inherent to each space. This dimension answers: What job must this fan perform beyond moving air?
Thermal Stratification Management
Heat rises. In rooms with ceilings over 9 feet, significant temperature differentials can develop between floor and ceiling—often noticeable in winter. A ceiling fan’s reverse function (clockwise rotation at low speed in cold months) gently pushes trapped warm air down along walls without creating a draft. This feature is essential for energy efficiency in rooms with high ceilings. Verify the fan includes a reliable reverse switch (a physical switch on the housing is often more dependable than remote-only control). In rooms prone to stratification (great rooms, stairwells, rooms with large windows), prioritize fans with robust low-speed torque to move dense, warm air effectively.
Humidity and Environmental Exposure
Moisture is a fan’s persistent challenge. Standard indoor fans lack protective coatings on motors and hardware. In humid environments, internal corrosion can begin long before visible signs appear.
- Damp-Rated: Suitable for covered porches, bathrooms without direct shower/tub steam exposure, laundry rooms. Features a sealed motor housing protecting against humidity but not direct water contact. Blades are moisture-resistant (e.g., ABS plastic, treated wood).
- Wet-Rated: Required for uncovered patios, gazebos, bathrooms with showers/tubs, pool houses. Fully sealed motor, corrosion-resistant hardware (stainless steel or galvanized), blades impervious to rain and heavy steam. Look for explicit UL Wet Location certification—not just “outdoor suitable” marketing language.
- Critical Bathroom Insight: Even in a bathroom with a shower, if the fan is installed outside the shower enclosure’s direct splash zone, a damp-rated fan may comply with electrical codes in some regions. However, given the high moisture levels from steam, wet-rated is strongly recommended for longevity and safety. Never install a standard indoor fan in any bathroom.
Noise Sensitivity and Acoustic Environment
Sound perception is highly contextual. A fan audible at 35 dBA (decibels) might be imperceptible in a lively kitchen but disruptive in a quiet bedroom. Consider noise requirements by room function:
– Critical Quiet Zones (Bedrooms, Nurseries, Home Offices, Libraries): Target fans rated below 30 dBA on low speed. DC motors often excel here. Avoid fans with plastic blade irons or lightweight housings that may amplify vibration.
– Moderate Noise Tolerance (Living Rooms, Dining Rooms): 30–40 dBA is generally acceptable. Focus on smooth operation—listen for consistent hum versus intermittent noises.
– High Ambient Noise Areas (Kitchens, Garages, Workshops): Noise is less critical; prioritize airflow capacity and durability. However, avoid excessively loud fans that force occupants to raise voices.
Illustrative Scenario: Installing a standard AC-motor fan in a home office directly below a bedroom may transmit subtle vibrations noticeable to light sleepers above. Replacing it with a DC-motor fan, designed for quieter operation and reduced vibration transmission, can resolve this issue without compromising airflow where needed.
Usage Patterns and Control Needs
How will people interact with the fan daily? This informs control strategy:
– Frequent Speed Adjustments (Bedrooms, Living Rooms): Wall controls offer intuitive, tactile adjustment. Smart fans integrate with routines (e.g., “Good Morning” scene sets fan to low speed).
– Infrequent Use / Hard-to-Reach Locations (Vaulted Ceilings, High Entries): Remote controls or smart integration are essential. Pull chains become inaccessible and frustrating.
– Child or Pet Safety: In rooms with active children or large pets, ensure blades are mounted at least 7 feet above the floor. Consider fans with integrated light kits that eliminate the need for separate hanging fixtures.
Dimension 3: Aesthetic Integration – Where Engineering Meets Intention
A technically sound fan that clashes visually creates subconscious friction. Aesthetic Integration ensures the fixture feels intentional—a harmonious element of your design narrative, not an afterthought. This dimension operates on three levels: scale, style language, and light integration.
Scale and Proportion: Avoiding Visual Dissonance
A fan’s visual weight must balance the room’s architectural scale. A massive 72-inch industrial fan can overwhelm a cozy 10×10 foot bedroom. A delicate 36-inch vintage fan may appear insignificant in a 20×30 foot great room.
The Visual Weight Assessment:
1. Ceiling Height: Higher ceilings can support fans with larger motor housings and more substantial blade brackets. Low ceilings demand sleek, low-profile profiles.
2. Room Volume: Large volumes call for fans with presence—wider spans, darker finishes, or textured blades. Small rooms benefit from lighter visual weights: white or light-finished blades, slender profiles.
3. Focal Points: Is the fan the room’s central visual anchor (e.g., over a dining table)? Or should it recede (e.g., in a hallway)? In anchor positions, distinctive design is appropriate. In transitional spaces, prioritize subtlety.
Practical Technique: Print a life-size template of the fan’s blade span. Tape it to your ceiling. Step back and observe. Does it feel balanced? Does it dominate the space uncomfortably? This simple test prevents aesthetic mismatches.
Style Language: Speaking the Room’s Design Dialect
Your fan should converse with your room’s existing design language. Identify dominant style cues:
| Room Style | Fan Characteristics to Seek | Elements to Avoid |
|---|---|---|
| Modern/Minimalist | Clean lines, matte black/white finishes, hidden hardware, geometric shapes, integrated LED | Ornate carvings, visible screws, brass finishes, curved blades |
| Transitional | Simple silhouettes, mixed materials (wood + metal), neutral finishes (brushed nickel, oil-rubbed bronze), subtle detailing | Extreme ornamentation, overly rustic textures, stark industrial elements |
| Traditional | Ornate motor housings, carved wood blades, classic finishes (antique brass, polished nickel), curved blade profiles | Ultra-sleek profiles, monochromatic flat colors, exposed industrial hardware |
| Coastal/Farmhouse | Distressed wood blades, whitewashed or weathered finishes, cage-style light kits, rope or iron accents | High-gloss finishes, sharp angular designs, cold metallic tones |
| Industrial | Exposed hardware, metal cage guards, matte black or iron finishes, riveted details, pipe-style downrods | Delicate curves, light wood tones, crystal accents, overly polished surfaces |
Critical Insight: Finish consistency matters more than exact color matching. A fan with a “brushed nickel” finish should harmonize with other brushed nickel fixtures (light switches, cabinet pulls) in the room. Mixing finishes creates visual tension unless done intentionally as a high-contrast design statement. When uncertain, match the fan finish to your room’s dominant metal accent.
Lighting Integration: Function and Ambiance in Harmony
Over 80% of ceiling fans include integrated light kits. This dual function demands careful consideration:
- Task Lighting Needs: Over a dining table? Ensure the light kit provides focused, shadow-minimizing illumination downward (look for kits with etched glass diffusers or multiple downward-facing bulbs). In a bedroom? Prioritize dimmable, warm-color-temperature (2700K–3000K) LEDs to support relaxation. Avoid cool-white (4000K+) bulbs in restful spaces.
- Ambiance vs. Utility: Some prefer fans without light kits, using the fan solely for airflow and installing separate, dedicated lighting (recessed cans, pendant lights). This is ideal when:
- Existing lighting is sufficient and well-placed
- You desire maximum flexibility in lighting design
- The fan location isn’t optimal for primary illumination
- The Dimming Consideration: If the fan includes lights, verify compatibility with your existing dimmer switches before purchase. Many LED-integrated kits require specific electronic low-voltage (ELV) dimmers. Incompatible dimming causes flickering, buzzing, or premature LED failure. Smart fans with app-based dimming bypass this issue.
- Future Flexibility: If you select a fan without a light kit but later need illumination, universal light kit adapters exist—but verify compatibility with your specific fan model. Retrofitting is often less seamless than factory integration.
Room-by-Room Application: Putting TRIAD Into Action
Apply the TRIAD System to the unique demands of each space. These profiles synthesize Technical Precision, Room Dynamics, and Aesthetic Integration into actionable blueprints. Each includes common scenarios, potential pitfalls, and tailored solutions.
The Primary Bedroom: Sanctuary of Restful Air
Your bedroom demands an environment optimized for sleep physiology. Air movement should be gentle, consistent, and silent. Disruptive drafts, noise, or harsh light can interfere with restorative rest.
TRIAD Breakdown:
– Technical Precision: Prioritize DC brushless motor for quiet operation on low speeds. Blade span: 44–54 inches for standard rooms (12×12 to 14×14 ft). Verify AMCA-certified CFM of 3,500–5,000 for effective circulation without turbulence. Mount blades 8–9 feet above floor. Ensure reverse function for winter stratification management.
– Room Dynamics: Target noise rating below 28 dBA on lowest speed. Dimmable, warm-white (2700K) integrated LED light kit supports pre-sleep wind-down. Wall control is convenient for bedside adjustment. If ceiling height exceeds 10 feet, use an extended downrod to position airflow within the sleeping zone.
– Aesthetic Integration: Choose finishes that promote calm—matte white, soft brushed nickel, light natural wood. Avoid high-contrast black in small rooms. Blades should complement existing tones. Light kit glass should diffuse light softly (frosted, etched); avoid clear glass that creates glare when lying in bed.
Common Scenario: Installing a standard AC-motor fan in a bedroom may result in audible operation on lower speeds, potentially disrupting sleep. Replacing it with a DC motor fan, designed for quieter performance, provides gentle airflow without noise disturbance. Pairing this with a dimmable warm-white light kit further enhances the restful ambiance.
Potential Pitfall: Selecting a fan based solely on “bedroom size” charts without considering acoustic performance. A technically adequate AC-motor fan may not meet the bedroom’s quiet operation needs. For light sleepers, a DC motor is often a functional necessity.
Budget Path: If DC motor is cost-prohibitive, seek AC fans specifically engineered for quiet operation (look for documented dBA ratings below 30). Install vibration-dampening mounts between fan and ceiling box. Always operate at the lowest effective speed.
Practical Tip: If working with an existing noisy fan, adding felt pads between blade brackets and motor housing may temporarily reduce vibration transmission—though replacement is the more reliable long-term solution.
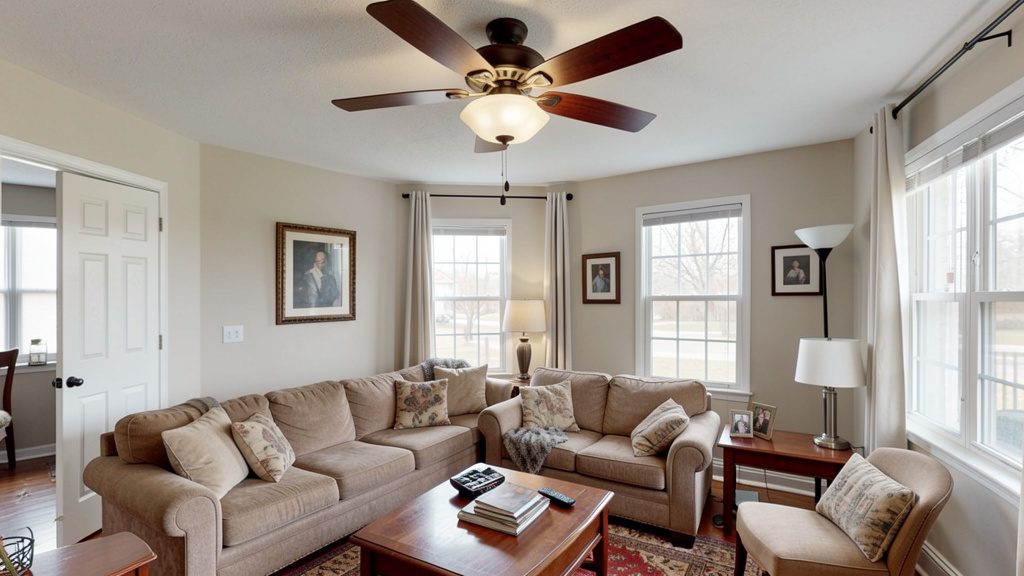
The Living Room: The Social Airflow Hub
Living rooms host diverse activities—from quiet reading to lively gatherings. Airflow must be adaptable, unobtrusive during conversation, and visually harmonious with your central design statement.
TRIAD Breakdown:
– Technical Precision: Size based on volume, not just footprint. For standard 9-foot ceilings: 52–56 inch span. For vaulted ceilings (12+ ft): 56–72 inch span or two 44–52 inch fans strategically placed. Target 5,000–7,500+ CFM. Sloped ceiling mount essential for vaulted spaces. Reverse function critical for winter comfort.
– Room Dynamics: Smooth speed transitions are vital—avoid fans that “jump” between speeds. Remote or smart control allows discreet adjustment during movie watching or entertaining. If the room has large windows causing solar heat gain, position fan to gently circulate air near seating areas without creating direct drafts on occupants.
– Aesthetic Integration: This is often the home’s visual centerpiece. Match fan style to your dominant design language (see Style Language table). For open-concept homes, ensure fan finish coordinates with adjacent room fixtures. If the room has architectural interest (beamed ceiling, tray ceiling), select a fan that complements—not competes with—these features. A statement fan can anchor a minimalist space.
Common Scenario: In a great room with high ceilings, a single undersized fan may create a weak downdraft column that dissipates well above the floor. Installing two appropriately sized fans on extended downrods, spaced to cover primary seating zones, creates balanced airflow. Integrating smart controls to activate fans when the HVAC system runs can enhance perceived comfort and support energy efficiency.
Potential Pitfall: Undersizing for volume. A fan rated for 400 sq. ft. may be insufficient in a 400 sq. ft. room with 15-foot ceilings. Calculate cubic footage: Length x Width x Height. When volume exceeds 3,000 cu. ft., strongly consider multiple fans.
Pro Tip: In open-plan layouts, position fans to gently guide air toward return vents, improving overall HVAC efficiency.
The Kitchen: Managing Heat, Humidity, and Activity
Kitchens generate intense localized heat, humidity spikes, and require unobstructed movement. Safety and targeted airflow are paramount.
TRIAD Breakdown:
– Technical Precision: 44–52 inch span typically sufficient. Prioritize higher CFM density (CFM per sq. ft.)—aim for 4,000–6,000 CFM to combat cooking heat. Critical: Install fan away from direct stove exhaust path. Position over dining area or island seating zone instead.
– Room Dynamics: Easy-clean blades are essential. ABS plastic, sealed wood, or metal blades wipe clean effortlessly. Avoid intricate blade designs that trap grease. Damp-rated is recommended due to humidity spikes. Pull-chain controls are hazardous near cooking surfaces—opt for wall control or remote.
– Aesthetic Integration: Match finish to cabinet hardware or faucet. Light kit should provide bright, shadow-minimizing task lighting over islands or tables (3000K neutral white ideal for food prep visibility). Avoid dark blades that show grease spots prominently.
Common Scenario: Installing a fan directly over a cooktop leads to rapid accumulation of grease on blades, creating a maintenance challenge and potential fire hazard. Relocating the fan to the kitchen’s eating area and ensuring a dedicated, externally vented range hood is installed over the stove resolves both safety and cleanliness concerns. The fan then circulates air comfortably where people gather.
Potential Pitfall: Placing the fan directly over the cooktop. This is a safety and maintenance concern. Always position fans in the occupant zone, not the heat/humidity generation zone.
Budget Path: Choose a fan with removable, easy-clean blades. Simplifies maintenance significantly.
Practical Tip: If a fan is already positioned near the cooking area, run it only on low speed during cooking to minimize grease accumulation, and clean blades regularly with an appropriate degreaser.
The Bathroom: Conquering Moisture with Precision
Bathrooms present a challenging environment for ceiling fans: steam, humidity spikes, and potential water exposure. Safety and corrosion resistance are non-negotiable.
TRIAD Breakdown:
– Technical Precision: Wet-rated is strongly recommended for all bathrooms, especially those with showers or tubs. UL Wet Location certification ensures motor housing, wiring, and hardware withstand constant moisture. Damp-rated may be acceptable in a half-bath with no shower, but wet-rated provides greater peace of mind. Blade span: 36–44 inches for most bathrooms (under 70 sq. ft.). Ensure adequate clearance from shower/tub walls per local electrical codes.
– Room Dynamics: Integrated light kit is highly practical—combines ventilation airflow with task lighting. Choose kits with high CRI (>90) LEDs for accurate color rendering. Some premium models combine ceiling fan airflow with dedicated exhaust venting—ideal for bathrooms lacking a separate exhaust fan. Verify the exhaust component meets local code requirements.
– Aesthetic Integration: White or chrome finishes resist showing water spots. Avoid wood blades entirely. Light kit glass should be sealed to prevent moisture ingress. For small bathrooms, low-profile hugger mounts maximize headroom while providing essential airflow to reduce mirror fog and mildew growth.
Common Scenario: Installing a standard indoor fan in a bathroom to save initial cost can lead to internal corrosion over time. Moisture damage may require replacement and electrical repairs, ultimately exceeding the price difference of a proper wet-rated fan. Investing in the correct rating from the start prevents safety hazards and long-term costs.
Potential Pitfall: Assuming “damp-rated” is sufficient for a shower/tub bathroom. Steam from a hot shower creates near-100% humidity—wet-rated is the only safe, durable choice for these environments.
Pro Tip: Run the fan for 20–30 minutes after showering to fully evacuate humid air. Pair with a timer switch or smart control for automatic shutoff.
Budget Path: Prioritize wet-rating over size or style. A smaller, properly rated fan outperforms a larger, incorrectly rated one. Look for value-focused brands with UL Wet certification.
The Dining Room: Elevating Ambiance and Comfort
Dining rooms demand airflow that enhances—not disrupts—the dining experience. Gentle circulation prevents stuffiness during meals without chilling food or creating disruptive drafts.
TRIAD Breakdown:
– Technical Precision: Blade span should align with table dimensions. For a standard 6–8 person table (7–9 ft long), a 52-inch fan centered over the table is ideal. Blades must be at least 18 inches from table edges and walls. Mount blades 30–36 inches above the table surface (typically 7.5–8.5 ft from floor). Target moderate CFM (3,500–5,000) with emphasis on smooth, consistent airflow.
– Room Dynamics: Dimmable, warm-white (2700K) light kit is essential for setting mood. Flicker-free dimming prevents distracting light pulses. Remote or wall control allows discreet speed adjustment. Avoid fans with audible “click” when changing speeds.
– Aesthetic Integration: This is a prime location for a statement fixture. Match fan style to your dining table and chairs. Light kit should complement your tableware—soft, diffused light is flattering; harsh direct light is not. Consider fans with reversible blades to adapt to seasonal decor changes.
Common Scenario: Uneven temperatures during meals—guests near windows feel chilly while others feel warm—can be resolved by installing a fan centered precisely over the table. Gentle, even airflow eliminates hot/cold spots. A warm, dimmable light kit enhances mealtime ambiance.
Potential Pitfall: Mounting the fan too low. Blades less than 30 inches above the table create disruptive drafts and pose a safety hazard. Use a downrod to achieve correct height.
Pro Tip: Test airflow before guests arrive. Sit at each chair position. Adjust fan speed until you feel a barely perceptible breeze—this is the ideal setting for dining.
Budget Path: If existing lighting is adequate and well-placed, choose a fan without a light kit and retain your dedicated dining chandelier. Ensures optimal light quality while adding airflow functionality.
The Home Office / Study: Fueling Focus with Calm Air
Concentration requires environmental stability. Airflow should be consistent, silent, and free of distracting visual or auditory cues. Thermal comfort supports cognitive performance.
TRIAD Breakdown:
– Technical Precision: DC brushless motor is ideal for quiet operation. 42–50 inch span for typical offices (10×12 ft). Prioritize fans with multiple low-speed settings—often the “medium” speed on standard fans is too aggressive for focused work. Reverse function is useful if the office has high ceilings or large windows causing stratification.
– Room Dynamics: Target noise rating below 25 dBA on lowest operational speed. Vibration must be imperceptible—critical if the desk is against the wall below the fan. Smart integration can be valuable: “Focus Mode” sets fan to a consistent, barely-there speed. Avoid fans requiring frequent remote adjustments—distraction breaks flow state.
– Aesthetic Integration: Neutral, non-distracting finishes (matte white, light oak). Avoid high-contrast colors or ornate details that draw the eye upward. If the fan includes a light, ensure it provides even, shadow-free illumination on the desk surface without glare on screens. Position fan so light doesn’t reflect off monitors.
Common Scenario: In a sun-facing home office, uneven cooling from HVAC systems can cause afternoon fatigue. Installing a DC-motor fan with smart controls, programmed to run at a low, consistent speed, creates a stable microclimate. The gentle airflow reduces perceived temperature, potentially allowing a slightly higher thermostat setting.
Potential Pitfall: Ignoring vibration transmission. Even a quiet fan can transmit subtle vibrations through ceiling joists to a desk below. Solution: Use rubber isolation mounts during installation; select fans with balanced blade systems and quality bearings.
Pro Tip: Pair fan use with a small desk fan pointed away from you (toward a wall). The ceiling fan circulates room air; the desk fan creates gentle background airflow that masks household distractions—without blowing papers around.
Outdoor Living Spaces: Porches, Patios, and Beyond
Outdoor fans face relentless environmental challenges: UV radiation, rain, wind, temperature swings, and insects. Durability is the primary specification.
TRIAD Breakdown:
– Technical Precision: Wet-rated is mandatory for any uncovered or partially covered space exposed to weather. Verify explicit UL Wet Location certification. Blade materials must be all-weather: ABS plastic, marine-grade plywood, or aluminum. Avoid any wood not specifically rated for exterior use. Downrods should be stainless steel or powder-coated steel. For large patios (>200 sq. ft.), multiple fans are often more effective than one oversized unit.
– Room Dynamics: Insect management: Some models feature sealed housings that prevent bug nesting. Consider fans with easy-access housing for seasonal cleaning. Wind resistance: In breezy locations, choose fans with shorter blades or reinforced blade irons. Remote or smart control is essential for adjustment without exposure to elements.
– Aesthetic Integration: Match architectural style of your home’s exterior. Coastal homes suit weathered wood or rope-accent fans. Modern homes pair with sleek metal profiles. Avoid finishes that show water spots prominently. Light kits should use shatter-resistant glass and warm-white LEDs to extend evening usability.
Common Scenario: Installing a “damp-rated” fan under a covered porch, assuming the roof provides full protection, can lead to moisture ingress during heavy rain or wind-driven spray. Replacing it with a true UL Wet-rated fan with stainless steel hardware and all-weather blades ensures reliable, long-term operation through varying weather conditions.
Potential Pitfall: Confusing “damp-rated” with “wet-rated” for outdoor use. Damp-rated = covered areas protected from direct rain. Wet-rated = exposed to rain, snow, hose-downs. When in doubt for outdoor spaces, always choose wet-rated.
Pro Tip: In insect-prone areas, running the fan on medium-high speed during evening use creates airflow that disrupts insect flight patterns, enhancing comfort without chemicals.
Budget Path: Prioritize wet-rating and blade material over size or light kits. A smaller, properly rated fan lasts longer and performs better than a larger, compromised one. Look for seasonal sales.
Special Cases: Conquering Architectural Challenges
Real homes rarely match textbook room dimensions. These solutions address complex scenarios where standard advice requires adaptation.
Vaulted / Cathedral Ceilings (Slopes > 15 degrees)
Challenge: Standard mounts fail; airflow becomes chaotic if fan tilts with ceiling.
TRIAD Solution:
– Technical: Sloped ceiling adapter rated for your specific pitch (verify max angle). Extended downrod (calculate: ceiling height at peak minus 8.5 ft). Dual-motor fans or two smaller fans often create more balanced airflow than one large fan.
– Room Dynamics: Position fans to cover primary seating/sleeping zones. Smart controls are valuable for adjustment from floor level.
– Aesthetic: Embrace the architecture. Choose fans with visual weight proportional to the ceiling scale. Downrods can be design elements—black iron pipes complement rustic styles.
Critical Mistake to Avoid: Installing a standard mount with a bent downrod. This creates dangerous stress points and severe wobble. Always use a purpose-built sloped ceiling kit.
Low Ceilings (< 8 feet)
Challenge: Standard fans hang too low; hugger fans may underperform.
TRIAD Solution:
– Technical: True low-profile hugger fan with verified high CFM. Seek models specifically engineered for low clearance (some use steeper blade pitch to compensate). AMCA certification is critical—many hugger fans exaggerate airflow.
– Room Dynamics: Prioritize ultra-quiet operation (DC motor ideal). Since blades are closer to occupants, even minor vibration is noticeable.
– Aesthetic: Sleek, minimalist profiles prevent visual crowding. Light-colored finishes (white, light gray) make the fixture feel less imposing.
Critical Mistake to Avoid: Using a standard fan with a very short downrod (“flush mount adapter”). This forces blades too close to the ceiling, creating turbulent, inefficient airflow and increasing wobble risk. Dedicated hugger design is essential.
Large Open-Concept Spaces (Great Rooms, Studios)
Challenge: Single fan creates isolated airflow columns; perimeter areas remain stagnant.
TRIAD Solution:
– Technical: Calculate total volume. For spaces > 4,000 cu. ft., plan for two fans. Space them to create overlapping airflow zones (typically 8–10 feet apart). Coordinate CFM ratings so combined output meets volume requirements.
– Room Dynamics: Synchronize controls—smart systems allow grouping fans to operate at identical speeds. Position fans over distinct functional zones (seating area, dining area).
– Aesthetic: Use identical fans for visual harmony. In asymmetrical spaces, two smaller fans often look more balanced than one massive fixture.
Critical Mistake to Avoid: Installing one oversized fan (72+ inches). Creates excessive noise, turbulent airflow near the center, and still leaves edges underserved. Multiple appropriately sized fans deliver superior comfort.
Rooms with Obstructions (Beams, Skylights, Stairwells)
Challenge: Physical barriers disrupt airflow patterns and complicate mounting.
TRIAD Solution:
– Technical: Map obstructions before purchasing. Beams may require offset mounting brackets. For stairwells, position fan to pull air up the stairwell in summer, pushing it down in winter.
– Room Dynamics: Test airflow patterns post-installation. Adjust speed/direction to guide air around obstacles.
– Aesthetic: Work with architecture. A fan mounted parallel to exposed beams can look intentional. Choose finishes that complement beam material.
Pro Tip: For complex airflow mapping in architecturally challenging spaces, consulting an HVAC professional can prevent costly installation errors.
Navigating Friction Points: Budget Constraints, Installation Realities, and Smart Compromises
Even with perfect knowledge, real-world constraints arise. This section provides ethical, effective pathways when ideals clash with practicalities—without sacrificing safety or core functionality.
The Budget Spectrum: Where to Invest, Where to Adapt
Ceiling fans range widely in price. Smart allocation maximizes value:
– Non-Negotiable Investments (Never Compromise):
– Moisture Rating: Always match rating to environment (Wet for outdoors/bathrooms with showers).
– Mounting Hardware: Use manufacturer-specified mounts for your ceiling type.
– Electrical Box: Must be UL-listed for fan support (rated for 35+ lbs). Never mount to a standard light box.
– High-Value Upgrades (Worth the Premium):
– DC Motor: For bedrooms, offices, living rooms—superior noise control and energy efficiency often justify cost.
– AMCA Certification: Guarantees advertised CFM is verified. Critical for large rooms or high ceilings.
– Quality Bearings: Sealed double-ball bearings support long-term stability and quiet operation.
– Acceptable Compromises (Context-Dependent):
– Light Kit: Omit if dedicated lighting exists and is well-placed. Redirect savings to motor quality.
– Remote vs. Wall Control: Remote is acceptable if wall switch installation is prohibitively expensive.
– Finish: Choose versatile neutrals (matte white, brushed nickel) that adapt to future decor changes.
Budget Scenario: Allocating funds across three rooms: prioritize the bedroom (DC motor, verified performance), then living room (quality AC motor with good bearings), then covered porch (verified wet-rated model). This strategy ensures critical comfort zones receive optimal performance while maintaining safety in secondary spaces.
Installation Realities: When to DIY and When to Call a Pro
Installation complexity varies:
– DIY-Friendly (Confident Intermediate Skill):
– Replacing an existing fan in the same location with identical electrical box.
– Installing a hugger fan on a standard flat ceiling with existing fan-rated box.
– Prerequisites: Comfortable with electrical safety protocols (turning off breaker, verifying wires), has helper for lifting, owns voltage tester.
– Professional Recommended (Strongly Advised):
– Installing where no fan existed previously (requires verifying/installing fan-rated electrical box).
– Sloped ceilings requiring specialized mounts.
– High ceilings (>10 ft) requiring tall ladders or lifts.
– Any uncertainty about wiring, box strength, or structural support.
– Professional Mandatory (Non-Negotiable):
– Upgrading electrical box in plaster/lath ceilings (risk of collapse).
– Installing in locations requiring new circuit runs.
– Any sign of existing wiring damage, moisture, or inadequate support.
Safety Imperative: The fan’s weight plus dynamic forces from rotation demand a secure mount. A falling fan causes severe injury. If your existing electrical box is plastic, stamped metal (not labeled “fan-rated”), or feels loose, stop. Hire an electrician to install a proper reinforced box. This investment is non-optional for safety.
Pro Tip: Many retailers offer installation services. Get quotes. Sometimes the convenience and warranty coverage justify the cost, especially for complex installs.
Smart Technology: Genuine Value vs. Gimmicks
Smart fans (Wi-Fi, Bluetooth, Zigbee) offer real benefits—but only if aligned with your lifestyle:
– Worth It If:
– You use voice assistants daily.
– You desire automation (fan activates when thermostat detects AC running).
– You frequently adjust fans from bed/couch.
– You want usage insights to optimize energy use.
– Skip It If:
– You prefer simple, tactile controls (wall switches).
– Your Wi-Fi is unreliable.
– You value long-term repairability (proprietary smart modules may limit service options).
– Budget is tight—redirect funds to motor quality.
– Critical Consideration: Verify smart hub compatibility before buying. Check recent user reviews for app stability and update frequency. Abandoned smart products may lose functionality over time.
The Refurbished / Secondhand Path: Proceed with Caution
Buying used fans carries risks:
– Hidden Damage: Internal corrosion, worn bearings, or cracked housings aren’t visible.
– Safety Hazards: Degraded wiring insulation, compromised mounting hardware.
– No Warranty: Motor failure means total loss.
– Compatibility Issues: Outdated mounting systems, non-standard parts.
If you must: Only consider units from trusted sources, inspect thoroughly for rust/cracks, verify all parts are present, and always replace mounting hardware and electrical components with new, UL-listed parts. For most homeowners, new budget fans from reputable brands offer better safety and performance guarantees.
Your Questions, Answered
Q: How do I calculate the exact CFM needed for my room?
A: Start with room volume: Length (ft) × Width (ft) × Ceiling Height (ft). For standard comfort, target 2–3 air changes per hour (ACH). Formula: (Room Volume × ACH) ÷ 60 = Minimum CFM. Example: 12×15 ft room, 9-ft ceiling = 1,620 cu. ft. Target 2.5 ACH: (1,620 × 2.5) ÷ 60 = 67.5 CFM per minute. However, this is a baseline. Add 15–25% for rooms with high sun exposure, poor insulation, or frequent occupancy. Always prioritize AMCA-certified CFM ratings over manufacturer claims. When in doubt, slightly oversized (within span guidelines) is better than undersized.
Q: What’s the definitive difference between damp-rated and wet-rated fans?
A: Damp-rated fixtures withstand humidity and condensation but not direct water contact. Suitable for covered porches (no rain exposure), bathrooms without showers, laundry rooms. Wet-rated fixtures are sealed to withstand direct exposure to rain, snow, and hose-downs. Required for uncovered patios, gazebos, bathrooms with showers/tubs, pool areas. Look for explicit “UL Wet Location” certification—not just “outdoor” or “weather-resistant” marketing terms. When moisture is present, wet-rated is always the safer, longer-lasting choice.
Q: Can I install a ceiling fan where only a light fixture exists?
A: Only if the existing electrical box is rated to support a fan’s weight and dynamic forces. Standard light boxes (plastic or thin metal) are not safe for fans. You must replace it with a UL-listed fan-rated box, securely anchored to a ceiling joist or support brace. This often requires attic access or cutting a small hole in the ceiling. If you’re unsure, consult a licensed electrician. Attempting to mount a fan to an inadequate box risks catastrophic failure. Safety must override convenience.
Q: Why does my fan wobble, and how can I fix it?
A: Wobble stems from imbalance, not motor failure. Causes: uneven blade weight (dust buildup, manufacturing variance), loose hardware, or improper mounting. Fix sequence: 1) Tighten all screws (blade brackets, downrod, canopy). 2) Clean blades thoroughly. 3) Use a balancing kit (included with most fans): attach clip to each blade mid-span while fan runs on low; when wobble reduces, attach weight to that blade. 4) Verify downrod is straight and canopy is flush. If wobble persists, blades may be warped—replace the set. Never ignore severe wobble; it stresses mounting hardware and creates safety hazards.
Q: Are more blades better for airflow?
A: No. Airflow depends on blade pitch, motor torque, and aerodynamic design—not blade count. Three-blade fans can move air efficiently due to reduced drag. Four or five blades may provide smoother, quieter operation due to better weight distribution. Six+ blades are primarily aesthetic. Focus on AMCA-certified CFM and blade pitch (12–15 degrees ideal) rather than blade count. A well-engineered 3-blade fan outperforms a poorly designed 5-blade model.
Q: How much can I realistically save on energy bills?
A: The U.S. Department of Energy states ceiling fans allow raising the thermostat setting by approximately 4°F with no reduction in comfort, potentially reducing cooling costs. Actual savings depend on climate, HVAC efficiency, usage patterns, and fan selection. Key: Fans cool people, not rooms. Always turn fans off when leaving the room—running them in empty spaces wastes energy. Pairing fans with strategic thermostat adjustments delivers maximum savings. In winter, use reverse mode to recirculate trapped warm air.
Q: What’s the quietest fan type for a bedroom?
A: DC brushless motor fans are consistently the quietest, especially on low speeds (<28 dBA). Within DC models, prioritize: sealed double-ball bearings (reduce vibration), balanced blade systems, and quality construction (metal housings dampen noise better than thin plastic). Avoid fans with plastic blade irons. Read professional reviews focusing on “low-speed noise.” Remember: installation quality affects noise—secure mounting and proper balancing are essential.
Q: Can I use a ceiling fan in a room with a ceiling height of exactly 8 feet?
A: Yes, but mounting height is critical. Use a low-profile hugger mount specifically designed for 8-foot ceilings. Standard mounts with downrods will position blades too low (<7 feet), creating a safety hazard and disrupting airflow. Verify the hugger model has adequate CFM for the room size—many sacrifice performance for profile. AMCA certification is crucial here. Never force a standard-mount fan flush to an 8-foot ceiling; turbulence and inefficiency will result.
Q: How do I clean my ceiling fan safely and effectively?
A: Safety first: Turn off power at the breaker. Use a sturdy ladder. Two effective methods: 1) Microfiber duster method: Extendable duster with electrostatic cloth traps dust without scattering it. Wipe each blade top and bottom. 2) Pillowcase method: Slide a pillowcase over each blade; as you pull it off, dust is contained inside the case. For sticky grime (kitchens), dampen cloth with mild soap solution—never spray liquid directly on fan. Dry thoroughly before restoring power. Clean monthly in high-dust areas; quarterly otherwise. Regular cleaning maintains balance, efficiency, and air quality.
Q: What should I do if my fan remote stops working?
A: Troubleshooting sequence: 1) Replace batteries (even if new—try known-good ones). 2) Reset remote/fan receiver per manual (often involves holding buttons). 3) Check for signal interference (move other electronics away). 4) Verify dip switches on receiver match remote settings. If unresolved, most fans have a manual override switch on the motor housing. For permanent fixes: universal replacement remotes exist (match frequency), or install a wall control module (requires minor wiring). Keep the manual override accessible.
Q: Is it safe to leave a ceiling fan running 24/7?
A: Modern fans designed for continuous operation (most quality models) are generally safe to run constantly. Benefits include consistent air mixing (reducing stratification), humidity control in damp climates, and potentially extending motor life (frequent start/stop cycles cause more wear than steady operation). However: 1) Ensure proper installation and balance to prevent vibration stress. 2) Clean regularly to avoid dust buildup affecting balance. 3) In very dry climates, constant airflow may increase dust circulation—use air filters. 4) Turn off when away for extended periods as a precaution. For most homes, running fans continuously in occupied zones is safe and beneficial.
Q: How do I choose between a flush mount and a downrod mount for a 9-foot ceiling?
A: For 9-foot ceilings, a downrod mount (typically 3–6 inches) is strongly preferred. It positions blades 7.5–8.5 feet above the floor—optimal for effective downdraft and safety. Flush mounts (huggers) force blades too close to the ceiling (<10 inches), creating turbulent “ceiling wash” that drastically reduces airflow efficiency and increases noise. Only choose a hugger for 9-foot ceilings if headroom is critically constrained and you select a hugger model engineered for higher airflow. The minor visual profile gain of a hugger is rarely worth the significant performance loss on standard-height ceilings.
Conclusion and Your Path Forward
Selecting the perfect ceiling fan for every room is no longer a guessing game. You now hold a complete framework—the TRIAD Selection System—to transform uncertainty into confident, precise decisions. Remember the three inseparable pillars: Technical Precision ensures the fan functions effectively within your room’s physical constraints; Room Dynamics aligns performance with human needs and environmental realities; Aesthetic Integration weaves the fixture seamlessly into your home’s visual narrative. Mastery lies not in memorizing specs, but in understanding how these dimensions interact. A fan chosen through this lens does more than move air—it actively enhances comfort, supports well-being, reduces energy demand, and elevates your daily experience within your home.
Recap: Your Three Non-Negotiable Actions
1. Measure Twice, Buy Once: Calculate room volume (not just square footage). Verify ceiling height, slope, and existing electrical box rating before shopping.
2. Match Rating to Environment: Wet-rated for moisture exposure (bathrooms with showers, outdoors). Never compromise here.
3. Prioritize Verified Performance: Seek AMCA-certified CFM and quality motor/bearing specs over marketing claims or superficial aesthetics.
The 24-Hour Observation Rule
Before finalizing any purchase, spend exactly 24 hours observing your target room. Note:
– When is the room used most? (Morning sun? Evening gatherings?)
– Where do you feel drafts or stagnant air?
– What sounds dominate the space? (Traffic hum? HVAC noise?)
– How does light fall at different times?
This simple practice reveals unspoken needs no spec sheet can capture. You might discover the “quiet” bedroom has street noise where gentle fan airflow provides helpful white noise, or the “sunny” living room has a cold corner needing gentle airflow redirection. Observation bridges the gap between theory and lived experience.
The Bigger Picture: Your Home as a Living System
A thoughtfully chosen ceiling fan is a single node in your home’s holistic comfort ecosystem. It works in concert with insulation, windows, HVAC, and even furniture placement. By optimizing airflow room by room, you reduce strain on major systems, support their longevity, and create microclimates of comfort tailored to human activity. This mindful approach to home environment management reflects a deeper understanding: that true comfort emerges from intentional design aligned with natural principles. You’re not just selecting a fan—you’re investing in daily moments of ease, efficiency, and sensory harmony.
Explore Our Complete Home Comfort System:
The Silent Guardian: A Step-by-Step Guide to Safe Ceiling Fan Installation and Wiring | Beyond the Breeze: Ceiling Fan Maintenance Rituals for Decades of Smooth Operation | Climate Harmony: Integrating Ceiling Fans with Smart Thermostats for Maximum Efficiency | Light and Air: Mastering Integrated Fan Lighting for Ambiance and Function | Architectural Airflow: Solving Complex Ceiling Challenges (Vaults, Beams, Open Concepts) | The Humidity Defense: Moisture-Management Strategies for Bathrooms and Kitchens | Energy Intelligence: Understanding Your Ceiling Fan’s Role in Home Efficiency