Your house speaks a language of creaks, cracks, and subtle shifts. Learn to listen before a whisper becomes a crisis.
Homes are not silent structures—they communicate constantly through sensory cues that reveal their health, stability, and hidden vulnerabilities. A faint musty odor near the basement stairs, a hairline crack tracing the ceiling corner, a switch plate that feels unnaturally warm: these are not random occurrences. They are deliberate signals in a language every homeowner can learn. Ignoring them risks escalating minor issues into structural concerns, safety hazards, or costly repairs. This guide transforms you from a passive resident into an attentive home listener—equipping you with a systematic framework to identify, prioritize, and respond to the physical, auditory, olfactory, and visual clues your home emits daily. Grounded in widely documented building science principles and cross-referenced with established maintenance protocols from industry resources, this resource empowers you to protect your home with informed awareness and calm clarity.
Introduction: Your Home Has a Voice—Are You Listening?
Walk into any century-old farmhouse still standing strong, and you’ll find evidence of generations who learned to read their home’s language. They noticed the floorboard that groaned differently before a storm, the window that stuck when humidity rose, the faint mineral scent signaling a slow leak behind the wall. Today’s modern homes—sealed tight with synthetic materials and complex systems—still speak, but their signals are often subtler, masked by drywall, insulation, and climate control. Yet the communication persists. A home under stress reveals itself through consistent, observable patterns documented across extensive inspection records and building diagnostics literature. These patterns transcend regional styles or construction eras: water seeks the path of least resistance; wood expands and contracts predictably; electrical resistance generates heat; foundations respond to soil conditions. Recognizing these universal principles transforms anxiety into agency. This guide synthesizes fragmented knowledge into a cohesive diagnostic system—because understanding why a sign matters is as critical as spotting it. You don’t need a contractor’s license to become fluent. You need curiosity, observation, and the right framework.
The Home Health Assessment Framework: Your Three-Tier Decision Compass
Before diving into specific warning signs, establish a mental model for prioritization. Panic helps no one. Dismissiveness invites escalation. The Home Health Assessment Framework categorizes every signal into one of three actionable tiers based on urgency, risk scope, and required response time. This system—aligned with risk-assessment approaches referenced in guidelines from organizations like the International Association of Certified Home Inspectors (InterNACHI)—prevents both overreaction and dangerous neglect. Keep this reference accessible during home walkthroughs:
| Tier | Risk Level | Time to Act | Physical Cues | Immediate Action |
|---|---|---|---|---|
| Tier 1: Immediate Danger | Life-threatening or potential for rapid property damage | NOW (Minutes to hours) | Burning smells, hissing gas, visible flames, structural collapse sounds, electrical arcing, sewage backup | Evacuate if unsafe. Shut off main water/gas/electric only if trained and safe to do so. Call emergency services. |
| Tier 2: Urgent Attention | High risk of escalation, significant damage, or safety hazard | Within 48 hours | Active water leaks, large structural cracks, persistent electrical issues, strong mildew odors, pest swarms | Document thoroughly with photos and notes. Contact a qualified professional. Implement safe temporary mitigation (e.g., bucket under leak, tarp over roof breach). |
| Tier 3: Monitor Closely | Low immediate risk but indicates developing issue | Schedule within 2–4 weeks | Hairline cracks, minor sticking doors, occasional condensation, faint odors, cosmetic wear | Photograph with date stamp. Track changes weekly. Plan for routine maintenance window. |
This framework eliminates guesswork. A hairline crack in drywall (Tier 3) requires documentation and monitoring—not panic. But that same crack widening rapidly beside a window frame with accompanying floor slope? That escalates to Tier 2. Context transforms classification. The framework’s power lies in its adaptability: a “minor” sign in one location (e.g., a damp spot in a rarely used basement corner) may be Tier 3, while the identical sign under a main electrical panel becomes Tier 1. Always assess location, progression rate, and system interdependence. A leak above the kitchen sink warrants attention; the same leak dripping onto subfloor near load-bearing framing requires urgent evaluation.
The Fundamental Principle: Homes degrade predictably. A Tier 3 sign consistently ignored may develop into a Tier 2 concern. A Tier 2 issue neglected can escalate toward Tier 1 severity. Your consistent vigilance interrupts this progression.
Why This Framework Works Where Others Fail
Most online lists present warning signs without hierarchy, leaving homeowners uncertain. Is a flickering light an emergency or annoyance? Without context, you can’t know. This system embeds context directly into the decision path. Consider these illustrative applications:
– The “Sticking Door” Scenario: A bedroom door sticks only during humid summer months (Tier 3: seasonal wood expansion). But if the same door sticks year-round and you notice diagonal cracks radiating from its frame and adjacent floors slope toward the exterior wall? That’s Tier 2: potential foundation movement affecting structural framing. The framework trains you to connect sensory inputs.
– The “Musty Smell” Scenario: A faint earthy odor in the basement after heavy rain (Tier 3: temporary moisture). But if the smell intensifies near an interior wall with no visible water and you feel cool dampness on the drywall surface and occupants report new respiratory irritation? Tier 2: hidden moisture requiring investigation. The framework encourages layered observation.
– The “Warm Outlet” Scenario: An outlet feels slightly warm after running a space heater for hours (Tier 3: normal resistive heating). But if it’s warm with nothing plugged in, has discolored plastic, or emits a sharp, acrid odor? Tier 1: immediate safety concern. Shut off the circuit breaker controlling that outlet and contact a licensed electrician promptly. The framework prevents dangerous normalization.
Master this compass first. Every subsequent section references it. Your home’s language only becomes actionable when paired with clear, proportional response protocols.
Structural and Foundation Warning Signs: When the Bones of Your Home Are in Trouble
Your home’s skeleton—foundation, framing, load-bearing walls—operates silently until compromised. Unlike a dripping faucet, structural distress rarely announces itself with noise. It speaks through geometry: doors that refuse to latch, floors that slope subtly, cracks tracing deliberate paths. These signs reflect physics in action: soil response to moisture, hydrostatic pressure, wood movement under sustained load. Learning to “read the lines” supports timely, appropriate action.
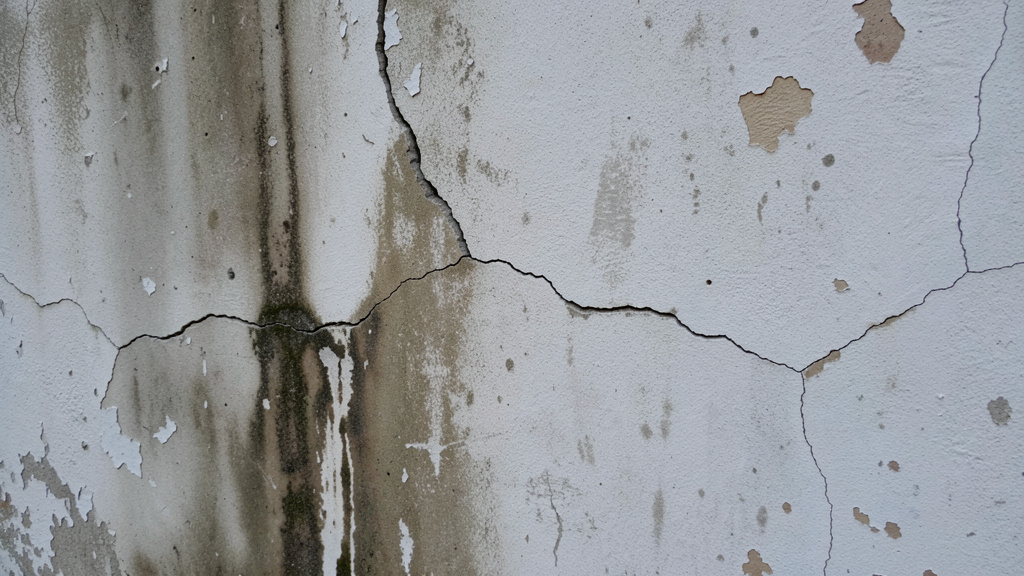
Hairline Cracks vs. Structural Cracks: The Geometry of Distress
Not all cracks indicate serious issues. Drywall cracks from normal settling are common; foundation cracks signaling movement require attention. The distinction lies in shape, location, width progression, and accompanying symptoms.
Hairline Cracks (Typically Tier 3):
– Appearance: Thin (<1/16 inch wide), often vertical or following drywall seams. Common above door frames or at wall-ceiling joints.
– Cause: Normal curing of drywall compound, minor seasonal framing movement, or temperature fluctuations.
– Verification Test: Place masking tape over the crack. Check in 30 days. If the tape remains intact with no new cracking beside it, it’s likely benign. Monitor quarterly.
– Common Mistake: Rushing to patch without monitoring. Patching hides the symptom. If underlying movement continues, the crack reappears—often larger. Document first; repair later.
– Adaptive Approach:
Method A (Ideal): Use a crack gauge monthly to track width.
Method B (Budget): Masking tape + dated photo log.
Method C (Seasonal): Check after significant weather events (heavy rain, drought, freeze-thaw cycles).
Structural Cracks (Tier 2 or Tier 1):
– Stair-Step Cracks in Brick/Masonry: Diagonal cracks stepping through mortar joints (not bricks) on exterior foundation walls. Indicates differential movement—part of the foundation shifting relative to adjacent sections. Width >1/8 inch or widening monthly = Tier 2. Accompanied by interior wall cracks or sticking doors = urgent.
– Horizontal Cracks in Foundation Walls: Requires professional assessment. Caused by lateral pressure from saturated soil, vegetation, or drainage issues. Even a small horizontal crack in poured concrete or block foundation warrants evaluation (Tier 2). Bowing (>1 inch inward deflection) or widening after rain elevates urgency.
– Diagonal Cracks Radiating from Window/Door Corners: Especially concerning if >1/8 inch wide, wider at one end, or accompanied by gaps between frames and walls. Suggests stress on framing.
– Verification Protocol: Measure width monthly with a simple gauge. Photograph with date stamp. Note correlation with weather. If width increases noticeably within 60 days, escalate to Tier 2.
Illustrative Example: A homeowner noticed a hairline crack above a dining room window. After taping it, heavy spring rains caused the tape to tear and the crack to widen with a matching stair-step pattern appearing on the exterior below. Prompt consultation with a structural professional revealed drainage concerns near the foundation. Early attention prevented further deterioration. Had the initial sign been dismissed, remediation complexity could have increased significantly.
The Door and Window Diagnostic: Your Built-In Level
Doors and windows are precision-fitted components. When framing shifts, they become sensitive indicators. Perform this quarterly check:
- The Close Test: Close interior doors gently. Do they latch smoothly? Do they swing open or shut on their own? A door consistently swinging open suggests the frame is no longer plumb. A door that won’t latch indicates frame distortion.
- The Gap Inspection: Run your hand around the frame. Feel for inconsistent gaps. A uniform small gap is normal. A gap widening at one corner while narrowing at another signals frame movement.
- The Level Check: Place a level vertically against the hinge side. Note significant deviations. Horizontal level across the top frame adds context.
- Pattern Recognition:
- Multiple doors on one side sticking? Suggests possible settlement on that side.
- Upper-floor windows sticking while lower floors operate smoothly? Indicates differential movement.
- Sticking only during humid months? Likely seasonal wood swelling (Tier 3). Document and monitor.
Critical Nuance: New construction (under 2 years) often experiences minor settling. Hairline cracks and slight door sticking may be normal. However, progressive worsening after the first year warrants professional evaluation. Track changes meticulously. Seasonal variations are common; persistent, worsening changes are not.
Floor Slope and Bounce: Feeling the Shift Underfoot
Walk through your home barefoot. Do floors feel consistently level? Slope isn’t always visible—it’s often felt.
- The Marble Test: Place a glass marble on the floor in suspect areas. Does it roll steadily toward a wall or corner? Document direction. Consistent rolling >6 inches indicates measurable slope (Tier 2 if new or worsening).
- The Level Method: Lay a level on the floor. Use shims under the low end until bubble centers. Measure shim height. Slope >1/2 inch over 10 feet warrants evaluation.
- Bouncy Floors: Walk deliberately across upper-floor rooms. Minor bounce in older homes with dimensional lumber joists may be normal. Pronounced bounce, especially near room centers or with new squeaks, suggests joist issues, inadequate support, or moisture damage (Tier 2).
- Location Matters: Slope toward an exterior wall often relates to perimeter conditions. Slope toward the center may signal interior support concerns. Bounce concentrated under heavy furniture could indicate localized stress.
Why This Matters: Even subtle slope can stress connections between framing members over time, exacerbate door/window issues, and potentially affect plumbing drain lines. In regions with specific geological considerations, uneven foundations may influence structural performance during seismic events. Early detection allows for targeted evaluation—often far less invasive than extensive repairs later.
Chimney and Exterior Clues: The Silent Sentinels
Your chimney alignment can reflect ground movement.
- Chimney Lean: Sight along the chimney’s edge from across the street. Noticeable tilt warrants assessment (Tier 2). Lean combined with cracks at the roofline or where chimney meets house elevates urgency.
- Separation Gap: Check where chimney meets roof and siding. A new or widening gap (>1/4 inch) indicates movement. Water intrusion through this gap accelerates deterioration.
- Exterior Wall Clues: Inspect foundation walls after rain. Water staining along a crack indicates active moisture movement. Efflorescence (white, chalky deposits) signals moisture passing through masonry—often preceding visible cracks. While efflorescence alone may be Tier 3, paired with interior dampness or cracks, it escalates to Tier 2.
Seasonal Tracking Template: Create a simple log:
– Date: [Month/Year]
– Recent Weather: Heavy rain? Drought? Freeze-thaw?
– Crack Width: [Measurement or “stable”]
– Door/Window Function: [Normal/Sticking Location]
– Floor Observation: [None/Marble rolls direction]
– New Signs: [List]
Review logs quarterly. Trends matter more than single observations.
Plumbing and Water Intrusion Red Flags: The Silent Progressors
Water is patient. A slow leak behind a wall may take months to manifest visibly, but in that time, it can compromise materials, encourage microbial growth, and affect structural elements. Plumbing issues rarely announce themselves loudly until failure is imminent. Your vigilance hinges on detecting subtle sensory shifts—odors, discolorations, pressure changes—before concerns escalate.
Decoding Water Stains: Location, Color, and Texture Tell the Story
A ceiling stain isn’t just “a leak.” Its appearance reveals context.
- Fresh Leak Stain (Tier 2):
- Appearance: Dark ring with a damp, cool center. May have a distinct “halo” effect—darker edge fading inward.
- Source Clues: Below an upstairs bathroom? Likely plumbing-related. Below attic access? Roof-related. Near exterior wall after rain? Flashing or window issue.
- Immediate Action: Place bucket. Trace stain upward if safe. Temporarily shut off main water to see if stain stabilizes (helps distinguish plumbing vs. roof source). Contact appropriate professional within 48 hours. Moisture meters can detect hidden dampness.
- Old/Inactive Stain (Tier 3):
- Appearance: Uniform light discoloration. Dry to touch. No halo effect. Often covered by paint layers.
- Action: Monitor. If no change over months and no odor, likely historical. Document location.
- Critical Distinction: A stain that reappears after drying or painting is active (Tier 2). Painting over active moisture traps it, potentially accelerating material deterioration. Resolve the source before cosmetic repair.
Wall Stains Behind Appliances: Check behind refrigerators, washing machines, and dishwashers quarterly. A faint yellow stain near the dishwasher inlet hose? Tier 2. Darkening grout in the shower wall? Tier 2—shower pan issues are common. Use a flashlight at a low angle to highlight subtle texture changes.
The Musty Smell Mystery: Understanding Moisture Indicators
Odors are powerful diagnostic tools. Your nose detects issues long before eyes do.
- Earthy/Musty Smell (Like Damp Basement): Often indicates microbial activity. Mildew is typically surface-level; mold may penetrate materials. Both require moisture. Location is critical: Smell near HVAC vents? Potential ductwork or drip pan concern. Localized to one closet? Hidden moisture behind wall. Intensifies after rain? Foundation or roof-related moisture entry.
- Tier Assessment: Faint smell only in humid weather with no visible growth = Tier 3 (improve ventilation). Persistent strong smell with visible discoloration or occupant sensitivity = Tier 2. Musty smell with soft, spongy drywall or warped baseboards = Tier 1 (significant moisture damage).
- Rotten Egg Smell (Sulfur): Indicates hydrogen sulfide gas—common in stagnant water within drains or water heaters. Usually not dangerous at low levels but signals bacterial buildup. Pour baking soda followed by vinegar down drains monthly to help prevent. Persistent smell from hot water only? Water heater component issue (Tier 2—contact plumber).
- Sewage Odor: Foul smell of waste. Caused by dried-out P-traps (U-shaped pipes under sinks that hold water to block sewer gases), cracked vent pipes, or main line concerns.
- Immediate Action: Run water in all infrequently used sinks/tubs/showers to refill P-traps. If smell persists, especially near floor drains or after flushing, contact a plumber promptly (Tier 1—sewer gas exposure requires attention).
DIY Air Quality Check: On a dry day, close windows/doors for 1–2 hours. Walk room-by-room noting locations and intensity of odors near baseboards, under sinks, around windows. Repeat after heavy rain. Changes reveal potential moisture pathways.
Faucet and Fixture Forensics: What Flow and Sound Reveal
Your taps offer clues about your plumbing system.
- Low Water Pressure (Whole House):
- Sudden Drop: Likely main line issue or municipal supply change. Check with neighbors. If isolated to your house, Tier 2.
- Gradual Decline: Mineral buildup in pipes (common in older systems) or pressure regulator concern. Tier 2—reduced flow affects appliance efficiency.
- Low Pressure (Single Fixture):
- Aerators/Showerheads: Unscrew and clean mineral deposits with vinegar soak. Usually resolves issue (Tier 3 maintenance).
- If Persists: Valve cartridge may need attention (Tier 2).
- Knocking or Banging Pipes (Water Hammer): Loud clanging when faucets shut off. Caused by unsecured pipes or lack of air chambers.
- Risk: Repeated hammering can loosen joints over time. Tier 2. Install water hammer arrestors (DIY-friendly) or consult plumber.
- Gurgling Drains: Flushing toilet causes sink to gurgle? Indicates blocked vent pipe. Vents allow air into the drain system; blockage creates suction that pulls water from P-traps. Tier 2—requires professional clearing of vent stack.
Hidden Leak Detection: Your Weekly 5-Minute Routine
Most significant water-related damage starts unseen. Implement this habit:
- Water Meter Check (Monthly): Ensure no water is running. Note meter reading. Wait 1–2 hours. Recheck. Any movement = potential hidden leak (Tier 2). Common culprits: toilet flapper, irrigation line, supply line.
- Toilet Dye Test (Quarterly): Drop food coloring in tank. Wait 15 minutes. Color in bowl without flushing = leaking flapper (Tier 3 fix, but wastes water).
- Under-Sink Inspection (Weekly): While using the sink, glance underneath. Feel pipes for moisture. Check cabinet bottoms for warping or stains. Shine flashlight on supply lines—look for corrosion or bulging.
- Appliance Hose Check (Biannually): Inspect washing machine hoses (replace rubber with braided stainless steel every 5 years per manufacturer guidance), dishwasher hoses, refrigerator lines. Bulges, cracks, or corrosion = replace promptly (Tier 2).
Illustrative Impact: A household performing their monthly meter check noticed movement overnight with no usage. Investigation revealed a slow supply line leak under flooring. Early detection prevented extensive material damage and potential microbial growth that could have developed over time. The leak was invisible—no damp spots, no odor. Only the meter provided the clue.
Condensation Clues: When “Sweating” Signals Trouble
Condensation on pipes, windows, or ducts isn’t always normal humidity.
- Cold Water Pipes “Sweating” in Summer: Common in humid climates. Usually harmless but can drip. Wrap pipes with foam insulation (Tier 3 maintenance).
- Condensation on Hot Water Pipes or Water Heater: Indicates inadequate insulation. Wastes energy. Tier 3.
- Window Condensation Between Panes: Failed seal on double-pane window. Reduces insulation value. Tier 3 repair consideration.
- Condensation on Interior Walls or Ceilings: Critical Indicator (Tier 2). Suggests insufficient insulation, air leaks, or excessive indoor humidity meeting cold surfaces. Creates conditions conducive to hidden microbial growth inside wall cavities. Check with moisture meter. Address root cause: improve ventilation (bathroom/kitchen exhaust fans), add insulation, or use dehumidifier.
Electrical System Alerts: Respecting the Current
Electricity demands respect. Warning signs are often subtle until failure occurs. Unlike plumbing leaks that pool visibly, electrical faults can hide within walls, generating heat silently. Your senses—sight, smell, touch—are primary detection tools. Never normalize electrical oddities.
Warm Outlets and Switches: Normal Heat vs. Concern
All electrical components generate some heat under load. Context determines response.
- Normal Warmth (Tier 3): Outlet feels slightly warm after running a high-wattage device (space heater, hairdryer) for 30+ minutes. Heat dissipates within 15 minutes of unplugging. Cause: Resistive heating. Solution: Avoid prolonged high-load use on single circuits; distribute appliances.
- Concerning Warmth (Tier 1):
- Outlet/switch feels hot to touch (uncomfortable to hold finger on) with minimal load or nothing plugged in.
- Discoloration: Yellow, brown, or black marks on faceplate or wall.
- Burning or sharp, acrid (“fishy”) odor.
- Immediate Action: DO NOT TOUCH. Shut off the circuit breaker controlling that outlet if you can do so safely. If odor persists or you see smoke, evacuate and call emergency services. Contact a licensed electrician immediately. This indicates potential loose connections or component failure—leading causes of electrical fires.
Why “Fishy” Smell Matters: Overheating electrical components can emit a distinct acrid odor due to thermal degradation of materials. This smell often precedes visible smoke. If detected, treat as Tier 1. Do not dismiss as “cooking smell” or “old house odor.”
Flickering Lights: Beyond the Loose Bulb
Flickering frustrates but often signals deeper issues.
- Single Fixture Flickers:
- Cause: Loose bulb, failing bulb, or incompatible dimmer switch.
- Fix: Tighten bulb. Replace bulb. Ensure dimmer matches bulb type (LEDs require specific dimmers). Tier 3.
- Multiple Lights Flicker Simultaneously:
- When: Only when AC unit, refrigerator compressor, or well pump kicks on.
- Cause: Normal voltage dip from high-startup appliances. Usually harmless if brief (<1 second). Tier 3.
- Escalation: If flickering lasts >2 seconds, dims significantly, or occurs without appliance cycling, indicates potential service issue. Tier 2—contact electrician and utility company.
- Whole-House Flickering or Dimming:
- Cause: Loose service conductor, failing transformer, or utility grid fluctuation.
- Action: If persistent or worsening, contact electrician promptly (Tier 1 concern). Loose main connections generate extreme heat.
Critical Safety Protocol: Never open your main electrical panel to “check connections” unless you are a licensed electrician. Panels contain lethal voltages. Document symptoms (video flickering pattern) and provide to professional.
Outlet and Switch Functionality: The Silent Failures
Test GFCI outlets monthly (press TEST, then RESET). For general outlets, a simple $10 outlet tester reveals dangerous wiring faults.
- Open Ground: Tester indicates missing ground wire. Critical for surge protection. Tier 2—repair recommended.
- Open Neutral: Causes unstable voltage. Tier 1—stop using outlet immediately.
- Hot/Ground Reverse: Extremely dangerous configuration. Tier 1—tag outlet “DO NOT USE” and call electrician.
- Physical Inspection:
- Cracks or chips in faceplate? Replace plate (Tier 3).
- Outlet feels loose when plugging in devices? Indicates worn internal contacts—replace outlet (Tier 2; loose connections cause arcing).
- Two-prong outlets in older homes? Not inherently dangerous if wiring is sound, but lack grounding. Tier 3 consideration for upgrade during renovations. Avoid cheater plugs unless verified ground exists.
Panel and Service Entrance Clues: The Heart of the System
Your main electrical panel communicates stress.
- Buzzing or Humming from Panel: Faint hum is normal. Loud, persistent buzzing or sizzling indicates potential arcing—loose connection or failing component. Tier 1—evacuate area if unsafe, shut off main if trained and safe, call electrician immediately.
- Burning Smell Near Panel: Tier 1 emergency. Same protocol as warm outlets.
- Frequently Tripping Breakers:
- Single Circuit: Overloaded circuit (too many devices). Tier 2—redistribute loads or add circuit.
- Main Breaker Tripping: Serious issue—short circuit, ground fault, or panel overload. Tier 1—do not reset repeatedly. Call electrician.
- Rust or Corrosion on Panel Exterior: Indicates moisture intrusion. Tier 2—panel must be inspected.
- Age Consideration: Panels manufactured by certain brands (e.g., Federal Pacific Electric, Zinsco) from specific eras have documented concerns. If you have one, consult an electrician about evaluation regardless of current function (Tier 2 proactive measure).
Outdoor Service Clues: Check where utility lines enter house. Look for animal nests, damaged conduit, vegetation touching lines (maintain clearance per local codes), rust on meter base.
Extension Cord and Power Strip Patterns: The DIY Danger Zone
How you use temporary power reveals risk tolerance.
- Extension Cords as Permanent Wiring: Running cords under rugs, through walls, or as permanent appliance connections = Tier 1 fire hazard. Cords overheat when confined. Install proper outlets.
- Daisy-Chained Power Strips: Plugging one strip into another multiplies risk. Tier 1. Use a single, UL-listed surge protector rated for total load.
- Warm Power Strips/Cords: Indicates overload. Unplug immediately. Tier 1.
- Frayed or Damaged Cords: Visible wire = Tier 1. Replace cord or appliance. Never tape over damage.
Illustrative Lesson: In documented fire investigations, extension cords subjected to friction (e.g., under furniture) have worn through insulation over time, leading to ignition. A warm spot on flooring near a cord is a critical warning sign that should never be normalized. This tragedy is preventable with routine cord inspection and proper permanent wiring.
HVAC and Indoor Air Quality Clues: Your Home’s Respiratory System
Your heating, ventilation, and air conditioning system circulates air, manages humidity, and filters particles. When compromised, it affects comfort, energy use, material integrity (via moisture), and occupant well-being. Warning signs span sound, airflow, humidity, and occupant observations.
The Language of HVAC Noises: Rattles, Bangs, and Whistles Decoded
Furnaces and air handlers aren’t silent, but new or changing sounds signal attention.
- Rattling or Banging at Startup/Shutdown:
- Cause: Loose access panel, ductwork vibration, or delayed ignition (in furnaces).
- Risk: Minor rattle = Tier 3 (tighten panel screws). Loud BANG = Tier 1 (potential heat exchanger concern). Shut off system immediately. Call HVAC technician.
- Squealing or Screeching:
- Cause: Worn blower motor bearings, loose fan belt (older systems), or failing capacitor.
- Action: Tier 2. Continued operation may seize motor. Turn off system. Schedule service.
- Hissing or Whistling:
- Cause: Refrigerant leak (AC/heat pump), air leak in ductwork, or restricted airflow.
- Risk: Refrigerant leaks reduce efficiency and strain components. Tier 2. Hissing near vents indicates duct leaks—wastes energy (Tier 3 maintenance).
- Clicking (Rapid, Repeated):
- Cause: Failing thermostat, electrical relay issue, or ignition control problem.
- Action: Tier 2. System may fail to start or cycle erratically.
Diagnostic Tip: Record the sound on your phone. Describe exactly when it occurs (e.g., “30 seconds after fan starts,” “only when heat kicks on”). This accelerates professional diagnosis.
Airflow and Temperature Inconsistencies: The Comfort Map
Walk through your home on a heating or cooling day. Note variations.
- Room-to-Room Temperature Swings >3°F:
- Causes: Undersized ductwork, blocked vents, closed dampers, leaky ducts, or failing zone system.
- Impact: System runs longer, increasing wear and energy use. Tier 2 if persistent.
- DIY Check: Ensure all vents are fully open and unobstructed. Check accessible ducts for visible disconnections.
- Weak Airflow from Vents:
- First Check: Replace air filter (clogged filter is #1 cause). Tier 3 maintenance.
- If Persists: Blocked evaporator coil, failing blower motor, or major duct leak. Tier 2.
- Warm Air from AC Vents / Cold Air from Heat Vents:
- AC Blowing Warm: Low refrigerant, compressor issue, or thermostat problem. Tier 2.
- Heat Blowing Cold: Pilot light out (older systems), gas valve issue, or heat exchanger concern. Tier 2. Shut off system if gas smell detected (Tier 1).
Humidity as a Warning Sign: Too Dry or Too Damp?
Ideal indoor relative humidity: 30–50%. Outside this range, concerns emerge.
- Excess Humidity (>60%):
- Signs: Condensation on windows (especially in winter), musty odors, peeling paint, warped wood.
- Causes: Inadequate ventilation, oversized AC unit (cools but doesn’t dehumidify sufficiently), plumbing leaks, or ground moisture.
- Risk: Conditions conducive to microbial growth, dust mites, material deterioration. Tier 2 if persistent.
- Action: Use exhaust fans during showers/cooking. Run dehumidifier. Ensure AC is properly sized. Check for hidden moisture sources.
- Excessively Dry Air (<30%):
- Signs: Static shocks, dry skin/throat, cracking wood furniture or floors.
- Causes: Overuse of heating systems, low outdoor humidity, inadequate humidification.
- Risk: Material damage, respiratory irritation. Tier 3.
- Action: Install whole-house humidifier or use portable units. Place water basins near heat sources.
Hygrometer is Essential: A $10 digital hygrometer provides objective data. Track readings seasonally. Sudden humidity spikes without weather change signal potential hidden moisture source (Tier 2).
Filter Forensics: What Your Air Filter Reveals
Check your filter monthly. It’s a diagnostic window.
- Even Gray Dust: Normal accumulation. Replace per manufacturer schedule (typically 1–3 months). Tier 3.
- Dark Black Soot: Indicates potential gas appliance malfunction venting soot. Tier 1 concern. Shut off gas appliances. Evacuate. Call HVAC technician and gas company immediately. Soot signifies incomplete combustion—potential carbon monoxide risk.
- Wet or Moldy Filter: Moisture entering return ducts. Cause: Leaky duct in humid space, clogged condensate drain. Tier 2—microbial spores may circulate.
- Heavy Pet Hair/Dander Clumping: Filter may be undersized for pet load. Upgrade to higher MERV rating (check system compatibility) or replace more frequently. Tier 3.
Carbon Monoxide: The Invisible Threat—Detection is Non-Negotiable
CO is odorless, colorless, and hazardous. It’s produced by malfunctioning fuel-burning appliances.
- Symptoms in Occupants: Unexplained headaches, dizziness, nausea—especially if symptoms improve when leaving home. Treat as medical concern.
- Prevention Protocol:
- Install CO alarms on every level (including basement) and outside sleeping areas. Test monthly. Replace per expiration date.
- Never use generators, grills, or camp stoves indoors or near windows.
- Schedule annual HVAC tune-ups including combustion analysis.
- If Alarm Sounds: Evacuate immediately. Call emergency services. Do not re-enter until cleared. Tier 1 absolute priority.
Critical Reminder: Smoke alarms detect fire; CO alarms detect poisoning. You need both. Test all alarms simultaneously during daylight saving time changes—a proven habit anchor.
Roof and Exterior Vulnerabilities: Your First Line of Defense
Your roof and exterior envelope shield everything beneath. Damage here can cascade inward: a missing shingle leads to attic moisture, which affects framing and indoor air quality. Exterior inspections require safety awareness—use binoculars from ground level; hire professionals for roof access. Focus on what you can safely observe.
Granule Loss in Gutters: A Roof’s Indicator
Asphalt shingles protect via embedded mineral granules. Age, weather, or installation factors cause granule loss.
- Normal Aging: Small amounts of granules in gutters after heavy rain or wind are expected, especially on newer roofs (<5 years). Tier 3.
- Warning Sign: Large accumulations of granules (looks like dark sand) in gutters, especially if shingles appear smooth, shiny, or bald in patches when viewed with binoculars. Indicates advanced wear. Tier 2—roof may be nearing end of service life. Schedule professional inspection.
- Critical Clue: Granules concentrated under specific roof sections? May indicate localized damage from branches, ice dams, or ventilation issues.
DIY Assessment: After rain, check gutters at ground level. Scoop a sample. If granules dominate the debris, document and monitor. Photograph roof sections annually from the same vantage point to track changes.
Shingle Distress Signals: Beyond Missing Pieces
Inspect roof edges and valleys (most vulnerable areas) with binoculars on a dry day.
- Curling or Cupping Shingles: Edges turn up or corners lift. Caused by poor ventilation (attic heat affects shingles), age, or manufacturing factors. Tier 2—compromises water shedding.
- Cracked or Split Shingles: Visible fractures. Allows water intrusion. Tier 2. Common on shaded slopes or after severe weather.
- Buckling: Shingles ripple or form waves. Indicates moisture trapped under shingles or deck movement. Tier 2.
- Moss or Algae Growth: Dark streaks (algae) or thick green growth (moss). Algae is mostly cosmetic (Tier 3). Moss retains moisture against shingles, accelerating decay. Tier 2—remove carefully (never power wash; lifts granules). Improve shade/ventilation.
- Missing Shingles: Obvious Tier 2 issue. Even one missing shingle exposes underlayment. Temporary fix: professional tarping. Permanent: shingle replacement.
Valley Vulnerability: Roof valleys channel heavy water flow. Check for rust spots on metal flashing, missing shingles, or debris buildup. Clean valleys gently. Debris dams cause water to back up under shingles—major leak source.
Flashing Failures: The Common Leak Catalyst
Flashing (thin metal strips) seals joints around chimneys, vents, skylights, and walls. It’s a frequent leak source.
- Visual Clues (Ground Level): Rust, corrosion, or separation at flashing edges; cracked sealant around penetrations; water stains on siding below chimney or vent pipe.
- Critical Areas:
- Chimney Flashing: Step flashing should be tight against chimney. Gaps >1/8 inch warrant attention. Tier 2.
- Pipe Boots: Rubber seals around plumbing vents crack with age. Brittle, cracked boots = Tier 2. Replace with metal-reinforced boots.
- Wall Flashing: Where roof meets a vertical wall. Missing or damaged flashing allows water entry. Tier 2.
Temporary Mitigation: For small flashing gaps, apply roofing cement only as emergency patch until professional repair. Never use standard caulk—it fails quickly under UV exposure.
Gutter and Downspout Intelligence: Directing Water Away
Gutters protect your foundation. Clogged or damaged gutters cause water to cascade down walls, saturating soil against foundation.
- Sagging Gutters: Indicate loose hangers or overloaded debris. Tier 2—water pools, causing leaks at seams.
- Peeling Paint/Staining on Siding Below Gutters: Water overflowing due to clogs or improper slope. Tier 2.
- Soil Erosion or Puddling Near Downspout Ends: Downspouts not extending far enough. Water should discharge at least 5–6 feet away. Tier 2—foundation saturation risk.
- Rust Holes in Gutters: Compromises integrity. Tier 2.
Seasonal Protocol:
– Spring/Fall: Clean gutters thoroughly. Check downspout flow by running hose into gutter.
– After Storms: Inspect for debris buildup or damage.
– Winter: Watch for ice dams (icicles at gutter edge with solid ice behind). Indicates attic insulation/ventilation concerns. Tier 2—ice dams force water under shingles. Never chip ice; use calcium chloride socks to melt channels.
Siding and Trim Tell-Tales: Moisture’s Footprints
Walk perimeter of house slowly. Look for:
- Buckling, Warping, or Bubbling Siding: Vinyl siding expands in heat; minor waviness is normal. Significant buckling indicates trapped moisture or installation issues. Wood siding warping = moisture absorption. Tier 2.
- Soft or Spongy Spots: Press siding gently (especially near ground level, windows, doors). Softness indicates material deterioration. Tier 2. Common on wood trim, fascia boards, or soffits.
- Peeling Paint or Caulk Failure: Paint peeling in large sheets on wood siding often signals moisture behind paint. Cracked or missing caulk around windows/doors allows water entry. Tier 2.
- Efflorescence on Masonry: White, chalky deposits on brick, stone, or concrete. Indicates moisture movement through material. Tier 2 if persistent—sign of drainage concerns.
- Mold/Mildew Streaks: Black or green streaks on shaded walls. Indicates prolonged moisture exposure. Tier 2—address drainage/shade issues.
Window and Door Perimeter Check: Critical vulnerability zone. Inspect:
– Cracked or missing exterior caulk
– Rotting wood trim (probe gently; soft wood = deterioration)
– Water stains on interior sills or frames
– Gaps between frame and siding
Landscaping and Grading Clues: Water’s Path to Your Foundation
Your yard’s slope directs water. Poor grading is a common contributor to moisture issues.
- Soil Sloping Toward House: Within 10 feet of foundation, ground should slope away at minimum 6 inches. If soil is level or slopes inward, rainwater pools against foundation. Tier 2. Solution: Regrade soil or consult drainage professional.
- Mulch Volcanoes: Piling mulch against foundation walls traps moisture and invites pests. Keep mulch 6+ inches away from siding. Tier 3 maintenance.
- Tree Roots Near Foundation: Large trees within 15 feet may seek moisture or affect soil stability. Consult arborist if concerned. Tier 2 consideration.
- Downspout Discharge: Ensure extensions direct water away. Splash blocks should be intact. Tier 2 if missing.
Pro Tip: After heavy rain, walk perimeter. Note where water pools, flows toward house, or saturates soil near foundation. Photograph problem areas. This visual evidence is invaluable for professionals.
Pest and Infestation Indicators: Uninvited Guests and Their Trails
Pests can cause nuisance, material damage, or health concerns. Early detection minimizes impact. Focus on evidence, not just sightings.
Termite Mud Tubes: Nature’s Highway
Subterranean termites build mud tubes to travel between soil and wood.
- Location: Foundation walls (interior or exterior), piers, plumbing penetrations, floor joists in crawlspaces.
- Appearance: Pencil-thin to 1-inch wide tubes of soil and debris. May be dry (abandoned) or moist (active).
- Test: Scrape open a section. If insects are present or tube is rebuilt within days, active infestation. Tier 1 concern. Contact licensed pest management professional immediately. Avoid disturbing further—professionals need to assess.
- Prevention Clues: Wood-to-soil contact, moisture-damaged wood, poor crawlspace ventilation. Eliminate these conditions.
Drywood Termites: Leave tiny piles of “frass” (hexagonal pellets) near kick-out holes. Tier 1 concern.
Rodent Droppings: Location Matters
Mouse vs. rat droppings differ in size and shape. Location reveals activity zones.
- Mouse Droppings: 1/8–1/4 inch long, pointed ends, scattered. Found along baseboards, in cabinets. Tier 2—indicates activity. Seal entry points (>1/4 inch gaps), set traps, remove food sources.
- Rat Droppings: 1/2–3/4 inch long, capsule-shaped, often in clusters. Found in attics, crawlspaces, garages. Tier 2—rats cause significant gnawing damage.
- Critical Protocol:
- Never sweep or vacuum droppings. Disturbs potential pathogens.
- Safe Cleanup: Wear gloves and mask. Spray with disinfectant. Wait 5 minutes. Wipe with paper towels. Seal in plastic bag. Wash hands.
- Escalation: Droppings near electrical panels, nests in insulation, gnaw marks on structural wood = Tier 1. Contact pest professional. Rodents chewing wires pose fire risk.
Carpenter Ant Trails: The Moisture Connection
Carpenter ants excavate moist, decaying wood to build nests but don’t eat it.
- Signs: Sawdust-like shavings (frass) with insect parts near window frames, door sills, or roof eaves. Rustling sounds inside walls. Winged swarmers indoors—indicates mature nest.
- Key Insight: Finding carpenter ants often means finding moisture damage. They nest in wood softened by leaks. Tier 2—address both pest and moisture source. Inspect for roof leaks, plumbing leaks, or poor ventilation where ants are active.
- DIY Check: Follow ant trails at dusk. They lead to nest entrance. Probe wood nearby; soft spots indicate damage.
Wasp and Bee Nests: Location Dictates Risk
- Eaves, Soffits, Vents: Paper wasp nests in open areas. Tier 2—remove professionally before nest grows large. Wasps become defensive when threatened.
- Wall Voids, Attics: Yellow jackets or hornets nesting inside walls. Tier 1 hazard. Do not block entrance—trapped insects may chew into living spaces. Contact pest professional immediately. Vibrations can agitate nests.
- Ground Nests: Often mistaken for “dirt mounds.” Tier 2—mark area to avoid accidental disturbance. Remove professionally.
Silverfish, Booklice, and Moisture Meters
These pests thrive in high humidity (>60%).
- Silverfish: Silvery-gray insects in bathrooms, basements. Feed on starches. Tier 3 indicator of excess moisture.
- Booklice: Tiny, pale insects in damp books or moldy areas. Tier 3 moisture indicator.
- Action: Reduce humidity with dehumidifier, improve ventilation, fix leaks. Eliminating moisture addresses the root cause.
Prevention Framework: Deny Entry, Deny Resources
- Seal Entry Points: Inspect foundation, utility penetrations, windows, doors for gaps >1/4 inch. Use steel wool + caulk for small holes; metal mesh for larger gaps. Tier 3 maintenance.
- Eliminate Food/Water: Store pet food sealed. Fix leaky faucets. Clean crumbs nightly. Tier 3.
- Reduce Harborage: Trim shrubs 1+ foot from house. Store firewood 20+ feet away. Keep garages/sheds tidy. Tier 3.
- Monitor: Place glue boards in dark, quiet areas. Check weekly. Early detection prevents infestations.
Illustrative Case: A homeowner noticed tiny wood shavings near a bathroom window sill. Initially dismissed, two months later the window frame was soft and crumbling. Investigation revealed carpenter ants nesting in wood decayed by a slow window leak. Repair costs were significant. Early intervention (sealing window, fixing leak) would have been a relatively minor expense. The shavings were a Tier 2 warning that, with attention, could have prevented escalation.
Navigating the Gray Areas: When to Call a Professional vs. DIY Fixes
Knowledge empowers action—but wisdom knows its limits. Misjudging DIY scope risks safety, voids warranties, and escalates costs. This section provides clear decision filters, budget-conscious pathways, and ethical boundaries. Always prioritize life safety over cost savings. Guidelines from organizations like the International Association of Certified Home Inspectors (InterNACHI) emphasize that knowing when to seek qualified help is a hallmark of responsible homeownership.
The Professional vs. DIY Decision Matrix
Ask these questions before proceeding:
| Question | DIY Path (Tier 3) | Professional Path (Tier 2/1) |
|---|---|---|
| Does it involve gas lines, main electrical panel, or structural framing? | ❌ Never | ✅ Licensed plumber, electrician, engineer |
| Is there active water leakage, fire damage, or visible microbial growth covering >10 sq ft? | ❌ Temporary mitigation only (bucket, tarp) | ✅ Water restoration pro, remediation specialist |
| Do local building codes require permits/inspections? | ❌ Research first | ✅ Permitted contractor ensures compliance |
| Am I emotionally stressed or rushed? | ❌ Stop. Fatigue causes errors. | ✅ Hire pro. Peace of mind has value. |
| Will this affect home warranty or insurance? | ❌ Unauthorized repairs may void coverage | ✅ Use approved vendors |
Critical Boundary: If a task requires shutting off main utilities and you are unsure of the procedure, call a professional. One wrong move can create significant risk. Safety is non-negotiable.
Budget Constraints: Smart Triage for Limited Funds
Financial pressure tempts shortcuts. This framework maximizes protection within constraints.
- Tier 1 Emergencies (Non-Negotiable):
- Action: Contact emergency services or licensed pro immediately.
- Budget Tip: Many contractors offer payment plans. Explain urgency—they often prioritize safety issues. For gas/electrical emergencies, utility companies may have assistance programs. Never delay Tier 1 responses.
- Tier 2 Urgent Issues (Strategic Mitigation):
- Temporary Fixes (Buy Time):
Roof Leak: Professional tarping ($150–$300) vs. full repair.
Pipe Leak: Pipe clamp or epoxy putty stick (temporary seal until plumber arrives).
Window Leak: High-quality exterior caulk + flashing tape (temporary barrier). - Prioritization: Address issues threatening multiple systems first. A foundation crack allowing moisture intrusion (affects structure + indoor air) outranks a cosmetic siding issue.
- Get Multiple Quotes: For repairs >$500, obtain 3 written estimates. Ask: “What happens if we delay 30 days?” A reputable pro will explain risks honestly.
- Tier 3 Monitoring (Preventive Investment):
- Low-Cost Vigilance: $20 moisture meter, $10 outlet tester, $15 hygrometer. These tools prevent costly surprises.
- Seasonal Maintenance Fund: Set aside $50/month. Covers filter replacements, gutter cleaning, caulk touch-ups—preventing Tier 2 escalations.
- Skill Building: Use Tier 3 tasks to learn. Watch educational videos from certified sources (InterNACHI, This Old House). Practice caulking on scrap wood. Knowledge reduces future repair costs.
Red Flags in Contractor Selection: Protecting Yourself
Hiring the wrong pro compounds problems. Vet rigorously.
- Verify Licenses & Insurance: Ask for license number. Verify with state licensing board website. Request certificate of insurance (liability + workers’ comp). No insurance = you liable for injuries on your property.
- Avoid Door-to-Door “Storm Chasers”: After weather events, unlicensed crews target neighborhoods. Get local referrals. Check reviews with scrutiny (look for detailed reviews, not just ratings).
- Written Contract Required: Must include scope of work, materials, timeline, payment schedule (never pay >10% upfront), warranty details. Verbal agreements are unenforceable.
- Trust Your Gut: If pressured to sign immediately, prices seem too good to be true, or they dismiss your questions—walk away. Ethical professionals welcome informed clients.
Ethical DIY Boundaries: When “Saving Money” Costs More
- Electrical: Replacing an outlet/switch is DIY-friendly if you shut off breaker and verify power is off with tester. Running new circuits, panel work, or GFCI installation in wet areas? Hire electrician. Faulty wiring causes fires years later.
- Plumbing: Fixing a faucet cartridge or toilet flapper is safe DIY. Soldering copper pipes, rerouting drain lines, or working on main supply lines? Hire plumber. Hidden leaks cause significant damage.
- Structural: Never attempt foundation repairs, beam replacements, or wall removals without engineer oversight. “Jack up the sagging floor” videos ignore load paths—risking collapse.
- Microbial Growth: Small surface mold on tile grout? Clean with appropriate solution. Growth on drywall, insulation, or structural wood? Hire remediation pro. Disturbing growth spreads spores. Professionals contain area and use proper filtration.
The True Cost of DIY: Factor in tool purchases, material waste from errors, time investment, and risk of escalation. Sometimes a professional fee prevents much larger future costs. Wisdom lies in honest self-assessment: “Do I have the skill, tools, time, and risk tolerance for this?”
Your Questions, Answered
Q: How often should I inspect my home for these warning signs?
A: Conduct a focused 15–20 minute walkthrough monthly (check under sinks, test GFCIs, note odors). Perform a comprehensive seasonal inspection (spring/fall) covering all systems outlined here—foundation, roof, HVAC filters, grading. Consistent, brief checks help prevent many major issues. Tie inspections to existing habits: change smoke alarm batteries during daylight saving time shifts; check gutters after first significant leaf fall.
Q: I found a small crack in my foundation. Should I panic?
A: Not immediately—but document and monitor. Use the Home Health Assessment Framework: Is it hairline (<1/16 inch), vertical, and stable? Likely Tier 3 seasonal movement. Place tape over it; check in 60 days. If it’s horizontal, stair-step pattern, widening, or accompanied by interior cracks/sticking doors, treat as Tier 2. Contact a structural professional for evaluation. Never inject sealant without professional assessment—hiding the symptom prevents diagnosing the cause.
Q: My outlet feels warm, but nothing is plugged in. Is this dangerous?
A: Yes—this is a Tier 1 warning sign. Warmth with no load indicates a potential loose connection, overloaded circuit, or failing device inside the wall. Loose connections generate intense heat. Immediately shut off the circuit breaker controlling that outlet. Do not use the outlet. Contact a licensed electrician promptly. Do not dismiss it as “normal”—this is a leading cause of electrical fires.
Q: There’s a musty smell in my basement, but I don’t see visible growth. Should I be concerned?
A: Absolutely. Odors indicate moisture activity even without visible signs. Musty smells signal hidden moisture—behind walls, under flooring, or in HVAC ducts. Tier 2 urgency. First, measure humidity with a hygrometer. If >60%, run a dehumidifier. Next, inspect for water stains, efflorescence on walls, or damp spots. Check sump pump operation. If smell persists, hire a certified inspector with moisture meters to locate the source. Ignoring it risks occupant sensitivity and material damage.
Q: Can I ignore hairline cracks in my drywall?
A: Monitor, don’t ignore. Hairline cracks at seams or corners are often normal settling (Tier 3). But track them: photograph with date, place tape over crack. If it widens, lengthens, or new cracks appear nearby—especially radiating from windows/doors—it may indicate framing movement. Context matters: one crack in a 10-year-old home is likely benign; multiple new cracks after significant weather warrant investigation. Documenting changes provides crucial data for professionals.
Q: How do I know if my roof needs replacement versus repair?
A: Key indicators: 1) Granule loss exposing asphalt mat (shingles look smooth/shiny), 2) Curling/cracking shingles across multiple roof sections, 3) Leaks persisting after flashing repairs, 4) Roof age approaching manufacturer’s expected service life. Get inspections from licensed roofers. Ask: “Is this isolated damage or systemic wear?” A reputable pro will show you photos of problem areas. Temporary repairs may suffice for minor damage on a young roof; widespread wear requires replacement. Never install new roofing over existing layers without professional evaluation—traps moisture and may void warranties.
Q: My circuit breaker trips frequently. Can I just replace it with a higher-amp breaker?
A: Never. This is extremely dangerous and violates electrical code. Breakers trip to prevent wire overheating. Replacing with a higher-amp breaker allows wires to overheat before tripping—creating fire risk. Causes include overloaded circuits (too many devices), short circuits, or failing breaker. Contact a licensed electrician to diagnose the root cause. They may recommend adding a new circuit or redistributing loads. Safety devices exist for a reason—never bypass them.
Q: Is condensation on my windows a sign of a bigger problem?
A: It depends. Condensation on the room side of single-pane windows in winter is normal (warm indoor air hits cold glass). But condensation between double-pane windows indicates seal failure (Tier 3 repair). Condensation on interior walls or ceilings is a Tier 2 warning—signaling insufficient insulation, air leaks, or excessive indoor humidity meeting cold surfaces. This creates conditions for hidden microbial growth inside walls. Address root cause: improve ventilation (use exhaust fans), add insulation, or use a dehumidifier. Persistent wall condensation warrants professional evaluation.
Q: I see tiny holes in my hardwood floor. Could this be termites?
A: Possibly—but differentiate. Termite exit holes are tiny (1/16 inch), often with soil residue. More commonly, small holes are from powderpost beetles (leave fine “flour-like” dust) or old nail holes. Probe wood around holes with an awl—if soft or crumbly, suspect insect damage. Tier 2: Contact a licensed pest management professional for inspection. They’ll identify insect type, extent of damage, and treatment options. Do not apply store-bought pesticides—they may contaminate area and hinder professional treatment. Early detection limits repair scope.
Q: How can I tell if a water stain on my ceiling is active or old?
A: Active stains feel cool/damp to touch, have a dark “halo” ring, and may grow after rain. Old stains are uniformly tan/yellow, dry, and stable. Test: Place plastic sheeting taped tightly over stain for 48 hours. If moisture appears under plastic, leak is active from above. If plastic stays dry but stain is damp, moisture may be rising from below (less common). For active stains, place bucket, trace source (upstairs bathroom? roof?), and contact plumber/roofer within 48 hours. Never paint over active leaks—traps moisture and accelerates damage.
Q: My house smells like sewage occasionally. What should I do?
A: First, run water in all infrequently used drains (guest bath sinks, floor drains, utility tubs) to refill P-traps—dry traps allow sewer gases to enter. If smell persists, especially near floor drains or after flushing toilets, it indicates a blocked vent pipe or main line issue. Tier 1: Avoid using plumbing if smell is strong. Contact a licensed plumber promptly. Sewer gas contains compounds that require attention. Do not ignore intermittent smells—they often worsen over time.
Q: Are smart home sensors worth it for early warning?
A: Strategically, yes. Water leak sensors under sinks, near water heaters, or in basements provide instant alerts to phones—critical if you travel. Smart plugs monitor appliance energy use (spikes indicate strain). However, sensors supplement—not replace—human observation. A sensor won’t detect a hairline foundation crack or musty odor. Prioritize: 1) Master the observational skills in this guide, 2) Add sensors for high-risk zones (water heater, sump pump), 3) Maintain sensors (replace batteries annually). Technology enhances vigilance but doesn’t eliminate the need for routine checks.
Conclusion: Becoming a Proactive Home Listener
Your home is not a static asset—it’s a dynamic system in constant dialogue with its environment and occupants. The creak of a floorboard after rain, the faint mineral scent near the basement stairs, the subtle slope detected by a rolling marble: these are not nuisances to endure. They are data points in a language of care. By internalizing the Home Health Assessment Framework, you transform anxiety into actionable insight. You move from reactive panic (“Why is water on the floor?”) to proactive partnership (“I noticed the gutter was clogged last week; let me check the downspout discharge”). This shift protects more than property—it safeguards peace of mind, occupant well-being, and long-term value.
The Three Pillars of Home Vigilance
- Observe Without Judgment: Notice a crack without catastrophizing. Document it calmly. Track changes objectively. Fear clouds perception; curiosity clarifies it.
- Context Over Isolation: A single sign rarely tells the whole story. Layer inputs: location + progression + weather correlation + system interdependence. The door that sticks only during humidity is seasonal; the same door sticking plus a widening wall crack plus floor slope warrants professional evaluation.
- Action Aligned with Tier: Respond proportionally. Tier 1 demands immediate safety protocols. Tier 2 warrants scheduled professional engagement. Tier 3 invites mindful monitoring. This prevents both dangerous neglect and costly overreaction.
Your 24-Hour Rule: One Tiny Step Forward
Within the next 24 hours, complete this single action:
👉 Walk through your home with a notepad. In each room, note one thing you observe using your senses: a sound, a smell, a visual detail you’ve never consciously registered before. No judgment—just observation.
This practice rewires your relationship with your space. It builds the muscle of attention. Next week, add the monthly water meter check. The week after, inspect under one sink. Mastery compounds through micro-actions.
The Bigger Picture: Homes as Living Legacies
The homes that endure across generations aren’t built with magical materials—they’re stewarded by attentive listeners. The farmer who noticed the barn door sticking before the beam cracked. The grandmother who ran water in the guest bath sink every Sunday to keep P-traps full. These acts of quiet vigilance accumulate into resilience. By learning your home’s language, you join a timeless tradition of care. You honor the craftsmanship within your walls. You protect the sanctuary where memories are made. And you ensure that when your home speaks, you are ready to listen—and respond with wisdom.
Explore Our Complete Home Care System:
The Seasonal Home Maintenance Calendar: Month-by-Month Tasks to Prevent Costly Repairs | Decoding Contractor Quotes: A Homeowner’s Guide to Fair Pricing and Scope | Indoor Air Quality Mastery: Filters, Humidity, and Hidden Pollutants | Foundation Fundamentals: Drainage Solutions and When to Seek Help | The Prepared Homeowner’s Emergency Kit: Tools, Contacts, and Protocols