Multiply your indoor jungle sustainably—learn every propagation method with precision timing, troubleshooting guidance, and a practical framework for increasing your success rate.
Imagine watching a single leaf transform into a thriving new plant. Picture dividing a crowded snake plant to gift lush babies to friends. Envision your monstera cutting sprouting delicate white roots in a sunlit jar. Propagation isn’t magic—it’s accessible biology anyone can master. This comprehensive guide merges established horticultural principles with practical, step-by-step techniques for common indoor plants. Whether you’re rescuing a leggy pothos or planning seasonal propagation projects, you’ll gain the knowledge to multiply your collection thoughtfully, sustainably, and joyfully. No prior experience required—just curiosity and a pair of clean scissors.
Introduction
Propagation is the quiet revolution happening on windowsills worldwide. It transforms plant ownership from passive consumption into active creation. Beyond the financial benefit of growing your collection affordably, propagation deepens your connection to nature’s rhythms. You begin noticing subtle cues—a node swelling with potential, roots seeking moisture, seasonal shifts in growth energy. This practice cultivates patience, observation, and a deeper understanding of plant physiology. Historically, propagation preserved rare cultivars across generations; today, it empowers eco-conscious plant parents to reduce waste and share living gifts. Successful propagation consistently aligns with three foundational elements observed across horticultural practice: matching the method to the plant’s natural reproductive strategy, timing efforts with biological cycles, and creating supportive micro-environments. This guide synthesizes these principles into an adaptable system. Forget fragmented tutorials or oversimplified summaries. Here, you’ll find nuanced details—from tool preparation to diagnosing subtle stress signs—woven into a cohesive journey. Your propagation journey begins with awareness.
The Propagation Success Cycle: Your Framework for Reliable Results
Most propagation resources focus solely on how to take a cutting while overlooking why certain steps matter. This creates fragile knowledge: change one variable (humidity, season, plant type), and confidence wavers. The Propagation Success Cycle reframes propagation as a continuous, adaptable process—not a rigid recipe. This four-phase framework aligns with fundamental plant biology principles. When you understand the purpose behind each phase, you can troubleshoot intuitively and adapt to your specific conditions and plants.
Phase 1: Preparation – Setting the Stage for Success
Thoughtful preparation significantly influences propagation outcomes. Rushing this phase is a common source of avoidable setbacks. This goes beyond gathering supplies—it’s about strategic alignment with your plant’s needs.
Assessing Parent Plant Health
Only propagate from vigorous, pest-free specimens. A stressed plant (yellowing leaves, drooping, visible pests) lacks sufficient energy reserves to support new growth. Check undersides of leaves for spider mites or mealybugs. Gently inspect the stem base for firmness. Healthy parent plants show consistent new growth, resilient stems, and coloration true to their species. Why this matters: Propagules inherit the parent’s physiological state. A nutrient-deficient or stressed parent often produces cuttings with lower resilience.
Timing with Biological Rhythms
Plants respond to internal cues synchronized with light and temperature cycles. Propagating during active growth phases (typically spring and early summer in temperate zones) works with the plant’s natural increase in growth-related processes. For plants native to tropical regions with less seasonal variation (e.g., ZZ plants, snake plants), propagation may succeed year-round but often aligns best with periods of increased daylight. Critical nuance: “Spring” varies globally. In the Southern Hemisphere, target September–November. Near the equator, drier months may offer lower fungal risk. Why this matters: Attempting propagation during dormancy (late fall/winter for many common houseplants) often results in slower root development and higher vulnerability to setbacks.
Tool and Medium Readiness
Gather before handling your plant:
– Sharp scissors or pruners (sterilized with 70% isopropyl alcohol)
– Clean containers (jars, pots, trays)
– Rooting medium options (discussed per method)
– Optional: rooting hormone (powder, gel, or natural alternatives like willow water)
– Spray bottle with distilled, filtered, or dechlorinated tap water
– Labels and waterproof marker
Sterilization is a critical step. Pathogens present on tools or containers can introduce diseases that compromise vulnerable propagules. Wipe blades thoroughly with alcohol; rinse containers in a mild bleach solution (1:10 bleach to water), then air-dry completely. Why this matters: Preventing contamination at the cut site supports the propagule’s natural defenses during its most vulnerable stage.
Phase 2: Execution – The Art and Science of Taking Propagules
Execution is where careful technique supports biological potential. Precision here minimizes stress for both parent and propagule.
The Node: Your Command Center
For stem cuttings, the node—the slight bump or ring on the stem where leaves, buds, or aerial roots emerge—is essential. Roots develop from meristematic tissue at the node, not from the cut end. A cutting without a node cannot form roots. Identify nodes carefully: on pothos, they appear as subtle rings; on monstera, as ridges opposite leaf petioles. Why this matters: This tissue contains cells primed for regeneration. Including a healthy node provides the biological foundation for new root development.
The Cut: Clean, Precise, Purposeful
Position scissors ¼ inch below the lowest node you’re including. Cut at a 45-degree angle. This increases surface area for moisture uptake and root emergence while preventing the stem from sealing against container bottoms (which can trap moisture). For woody stems (e.g., fiddle leaf fig), use sharp pruners to avoid crushing vascular tissue. Why this matters: A clean cut preserves the stem’s internal pathways for moisture transport. Crushing damages these channels, hindering the cutting’s ability to stay hydrated before roots form.
Leaf Management
Remove leaves from the lower third of the stem—the section that will be submerged or buried. For large leaves (monstera, philodendron), trimming remaining leaves by one-third can reduce moisture loss. Never remove all leaves; photosynthesis provides energy for root development. For leaf-only propagation (snake plant, begonia), orientation is critical: the end closest to the original soil line must go down. Mark it lightly if unsure. Why this matters: Balancing foliage reduces stress on the cutting. Too much leaf area increases water demand before roots exist; too little deprives the cutting of necessary energy.
Phase 3: Aftercare – Nurturing New Life
Aftercare requires attentive observation. Patience here is active engagement, not passive waiting.
Humidity: The Invisible Scaffold
New propagules lack roots to draw water, yet leaves continue losing moisture. Elevated humidity (typically 60–80%) reduces this stress. Create a microclimate:
– Water propagation: Humidity is less critical initially (water surrounds the stem).
– Soil/medium propagation: Cover container with a clear plastic bag (vented with small holes) or use a propagation dome. Place in bright, indirect light—never direct sun, which can overheat cuttings under cover.
– Natural alternative: Group propagules together; collective transpiration gently raises local humidity.
Check daily. Light condensation on the cover is ideal. Heavy dripping indicates poor ventilation—open vents or lift the cover briefly. Why this matters: Balanced humidity prevents desiccation without creating stagnant, mold-prone conditions.
Light: Fuel Without Burn
Bright, indirect light supports energy production without damaging delicate tissue. East-facing windows are often ideal. South or west windows usually require sheer curtains. Insufficient light leads to weak, elongated growth; excessive light causes bleaching or crisping. Pro tip: If using artificial light, position full-spectrum LED grow lights 12–18 inches above propagules for 12–14 hours daily. Why this matters: Light drives photosynthesis to fuel root formation, but intense radiation can overwhelm undeveloped tissue.
Moisture Monitoring
– Water propagation: Refresh water every 3–5 days with room-temperature water. Cloudiness suggests bacterial activity; rinse stems gently.
– Soil propagation: Keep medium consistently damp like a wrung-out sponge. Test by inserting finger ½ inch deep. Avoid complete drying or sogginess.
– Perlite/LECA: Maintain water level just below the medium surface to encourage roots to grow downward.
Critical sign: Yellowing lower leaves may indicate moisture imbalance or early stress. Remove affected leaves promptly. Why this matters: Roots require oxygen. Overly wet conditions limit oxygen availability and encourage pathogens.
Phase 4: Integration – Welcoming New Plants to Your Collection
Integration is the final, thoughtful phase. Rushing transplanting can shock developing roots.
Root Readiness Check
Wait for clear signs of establishment:
– Water-propagated: Roots are 1–2 inches long with visible fine branching (“hairs”).
– Soil-propagated: Gently tug the cutting; slight resistance suggests root anchoring. Or carefully lift to assess development.
Transplanting too early risks damaging fragile roots. Waiting too long may lead to roots circling the container. Why this matters: A developed root system transitions more smoothly into its new environment and accesses nutrients effectively.
Potting Up Protocol
1. Choose a pot only 1–2 inches wider than the root ball. Oversized pots retain excess moisture.
2. Use fresh, well-draining potting mix (e.g., 2 parts potting soil : 1 part perlite : 1 part orchid bark).
3. Lightly moisten the medium before planting.
4. Create a hole, place roots gently, and backfill without compacting.
5. Water thoroughly until it drains. This settles the mix and eliminates air pockets.
Place the new plant in the same light conditions it received during propagation. Avoid fertilizer for 4–6 weeks—new roots are sensitive. Why this matters: Gradual environmental continuity minimizes shock. Fresh mix provides a clean, supportive start without overwhelming tender roots.
The Fundamental Principle: Propagation success grows from aligning human care with the plant’s innate biological rhythms. When we provide conditions that support the plant’s natural reproductive processes, new growth becomes a natural and achievable outcome.
Mastering Stem Cuttings: The Most Versatile Propagation Method
Stem cuttings work well for vining plants, shrubs, and many tropicals. They leverage the plant’s ability to form adventitious roots—roots emerging from non-root tissue. Understanding the biology behind this process builds adaptable skill.
Why Stem Cuttings Work: The Biology Simplified
Plants possess cells capable of regeneration under the right conditions. When a stem is severed, natural processes signal meristematic tissue at the node to differentiate into root cells. Auxin, a plant hormone concentrated at nodes, supports this transition. This explains why including a node and making a clean cut matters: we protect and activate the tissue holding regenerative potential. This principle is consistently observed across species from pothos to rosemary.
Tools and Materials Deep Dive
- Scissors vs. Pruners: Sharp embroidery scissors suit thin stems (pothos, philodendron). Bypass pruners (not anvil type) handle woody stems (rubber plant, dracaena). Dull tools crush vascular bundles.
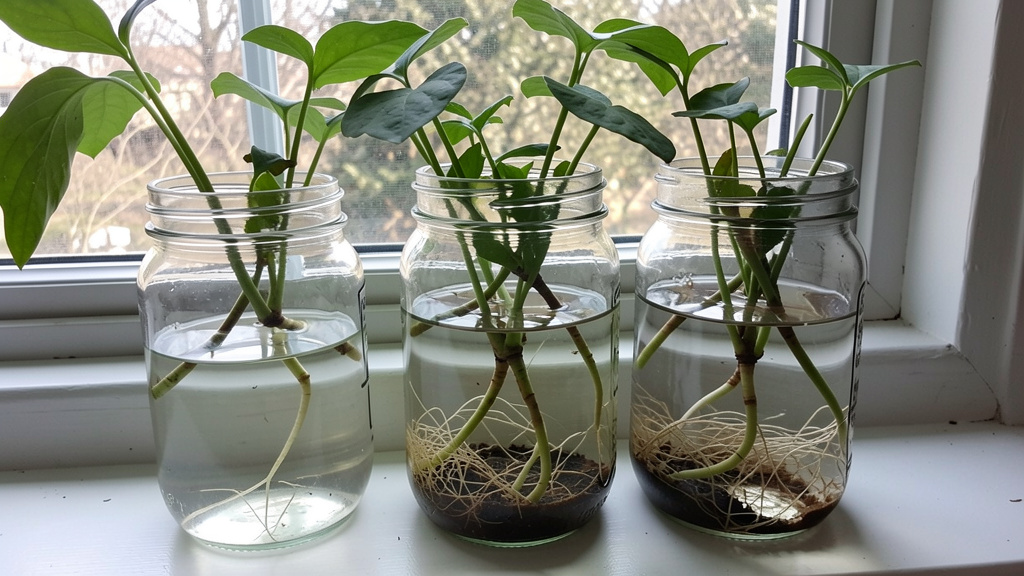
- Containers: Clear glass jars allow root monitoring. For soil propagation, terracotta pots offer moisture-wicking; plastic retains humidity well for beginners.
- Rooting Mediums Compared:
- Water: Beginner-friendly with visual feedback. Ideal for pothos, philodendron, monstera deliciosa. Consideration: Roots adapted to water may need careful transition to soil.
- Perlite: Sterile, pH-neutral, excellent aeration. Roots develop strong structure. Consideration: Holds no nutrients; requires transplanting once rooted.
- LECA (Clay Pebbles): Reusable, promotes airflow, reduces rot risk. Consideration: Requires hydroponic nutrients after rooting; initial investment higher.
- Soil Mix: Most natural transition. Use seed-starting mix or 50/50 peat/perlite. Consideration: Harder to monitor roots; requires careful moisture management.
- Sphagnum Moss: Retains moisture without sogginess; benefits acid-loving plants like hoyas. Consideration: Can compact over time; monitor moisture closely.
Budget Tip: Repurpose clean yogurt containers (add drainage holes) or egg cartons for multiple small cuttings. Sterilize thoroughly before use.
Step-by-Step: Taking a Stem Cutting (Pothos Example)
Step 1: Select the Stem
Choose a healthy vine section with 3–4 leaves and visible nodes. Avoid stems with flowers (energy diverted elsewhere) or damaged leaves. Locate the node below the lowest leaf you’ll keep.
Step 2: Make the Cut
Sterilize scissors. Cut ¼ inch below the node at a 45-degree angle. Place the cutting in room-temperature water immediately to prevent air blockages in vascular tissue.
Step 3: Prepare the Cutting
Remove the leaf attached at the lowest node (where roots will form). Trim remaining leaves by one-third if large. For pothos, multiple cuttings can be taken from one vine—each needs one node and one leaf.
Step 4: Choose Your Medium
– Water method: Submerge only the node; keep leaves above water. Place in bright, indirect light. Refresh water every 3–4 days.
– Soil method: Optional rooting hormone dip. Insert into pre-moistened mix up to the node. Cover with a vented dome.
– Perlite method: Fill container with damp perlite. Insert cutting deep enough to stand upright. Mist lightly; keep perlite moist but not saturated.
Step 5: Monitor and Wait
Roots typically appear within several weeks. Watch for:
– Positive signs: New leaf growth, white root tips, firm stem.
– Caution signs: Brown/mushy stem (possible rot), yellowing leaves (stress), cloudy water (bacterial activity).
Step 6: Transplant
When roots are 1–2 inches long with fine branching, pot into a appropriately sized container with fresh mix. Water lightly. Keep out of direct sun for one week.
Plant Spotlight: Stem Cutting Considerations
Pothos (Epipremnum aureum)
Highly adaptable. Thrives in water or soil. Take 4-inch cuttings with 2 nodes. Roots often appear within 10–14 days. Insight: Variegated varieties (Marble Queen, N’Joy) may root slower than solid green due to lower chlorophyll content—patience is helpful.
Monstera Deliciosa
Select stems with an aerial root and a node. The aerial root readily develops into the main root system. Submerge only the node and aerial root; keep the leaf dry. Water propagation shows clear root development. Nuance: Cuttings with fenestrated (split) leaves are mature; juvenile leaves also root well but may take longer to develop splits.
Philodendron Heartleaf (Philodendron hederaceum)
Propagation resembles pothos. Nodes are less pronounced—look for the tiny brown sheath (cataphyll) at the leaf base. Removing this sheath before water placement may reduce rot risk. Roots often form within 7–10 days.
ZZ Plant (Zamioculcas zamiifolia)
Stem cuttings are possible but slow (several months). Leaflet propagation is often preferred (see Leaf Cuttings section). For stem cuttings, use sections with multiple leaflets. Let the cut end callus (dry) for 24 hours before placing in perlite. ZZ stores water in rhizomes; overwatering is a common challenge.
Fiddle Leaf Fig (Ficus lyrata)
Requires consistent conditions. Take a 6-inch tip cutting with 3–4 leaves. Optional rooting hormone dip. Plant in coarse perlite. Maintain elevated humidity with a dome and gentle bottom warmth (e.g., propagation mat set to 75°F/24°C). Roots may take 6–10 weeks. Key factor: Stable warmth and humidity support success; fluctuations often lead to leaf drop.
Troubleshooting Stem Cuttings
| Symptom | Likely Cause | Solution |
|---|---|---|
| Stem turns brown/mushy at waterline | Bacterial activity from contaminated water or tools | Discard cutting. Sterilize container. Start anew; refresh water frequently; consider adding a drop of hydrogen peroxide to water |
| Leaves yellow and drop | Moisture imbalance, low humidity, or environmental stress | For soil: adjust watering to keep medium evenly moist. For water: ensure only node is submerged. Increase ambient humidity. Remove yellow leaves |
| No roots after several weeks | Insufficient light, cool temperatures, or dormant season timing | Move to brighter indirect location. Place container on a warm surface. If propagating late in the year, consider waiting until spring for optimal conditions |
| Roots are thin, white, and fuzzy | Healthy root development in progress | Continue current care. Transplant when roots reach 1+ inch with visible branching |
| Roots are brown, slimy, or sparse | Possible rot or poor oxygen exchange | Rinse roots gently. Trim affected sections with sterilized scissors. Transfer to fresh water or well-aerated medium like perlite. Improve air circulation |
| New leaf is tiny or deformed | Light levels too low or nutrient adjustment post-transplant | Relocate to brighter indirect spot. Wait 6 weeks before considering very light fertilization |
Illustrative scenario: In cooler environments, providing gentle bottom warmth can stimulate root development in cuttings that are slow to root due to lower ambient temperatures. Consistent conditions often make the difference.
Leaf Cuttings and Leaf Sections: Patience Rewarded
Leaf propagation suits plants that naturally reproduce via leaf fall or fragmentation—think forest floors where detached leaves root where they land. This method requires patience but offers deep satisfaction. Success depends on including tissue capable of generating both roots and shoots.
The Science of Leaf Regeneration
Not all leaves can regenerate a whole plant. Plants like snake plants (Sansevieria) and African violets have meristematic cells distributed along leaf margins or bases. When wounded, these cells can form a callus—a mass of undifferentiated cells that may develop into roots and shoots. This process draws on energy reserves stored in the leaf. Thin, delicate leaves (e.g., ferns) typically lack sufficient reserves and won’t propagate this way. Understanding this helps focus efforts on suitable plants.
Whole Leaf Propagation: Snake Plant (Sansevieria)
Why it works: Snake plant leaves are succulent, storing water and carbohydrates. Meristematic tissue runs vertically along the leaf edge.
Step-by-Step:
1. Select a healthy, mature leaf. Avoid very young or pale leaves.
2. Using sterilized scissors, cut the leaf into 2–3 inch horizontal sections. Crucial: Note orientation. The end closest to the original soil must go down. Mark the bottom end lightly.
3. Let sections air-dry for 24–48 hours until cut ends form a dry seal (callus). This reduces rot risk.
4. Insert bottom end ½ inch deep into barely moist cactus/succulent mix or perlite. Space sections 2 inches apart.
5. Place in bright, indirect light. Water only when the top inch of medium feels dry. Overwatering is a frequent challenge.
6. Wait patiently. Roots may take 6–12 weeks. Tiny plantlets (pups) emerge from the base after roots establish.
7. Once pups have 2–3 leaves and roots fill the pot, gently separate and pot individually.
Critical nuance: Variegated snake plants (e.g., Laurentii) often produce solid green plantlets from leaf sections. Variegation is a genetic trait not always carried in leaf tissue. For true-to-type variegated offspring, division (covered later) is the most reliable method.
Leaf Section Propagation: Begonia Rex and Peperomia
These plants propagate from leaf wedges containing the main vein.
Begonia Rex Method:
1. Choose a mature, healthy leaf. Lay it flat.
2. Using a sterilized craft knife, cut the leaf into triangles, ensuring each piece contains a portion of the central vein.
3. Optional: Dip cut edges in rooting hormone.
4. Press sections vein-side down into moist seed-starting mix. Secure with small pins or pebbles to maintain contact.
5. Cover with a clear dome. Place in warm (70–75°F / 21–24°C), bright indirect light.
6. Mist lightly as needed. New plantlets emerge from the vein in 4–8 weeks. Transplant when 2 inches tall.
Peperomia Method (similar):
Peperomia obtusifolia (Baby Rubber Plant) and Peperomia caperata respond well. Cut a healthy leaf with ½ inch of petiole (stem) attached. Insert petiole into moist mix. Cover. Roots form at the petiole base; new growth emerges from the leaf axil. Alternatively, lay the leaf flat on soil, pin edges gently, and wait for plantlets along margins.
African Violet (Saintpaulia) Leaf Propagation
A rewarding project for many growers.
- Select a middle-aged leaf (not oldest or youngest). Cut petiole to 1–1.5 inches.
- Optional: Dip petiole end in rooting hormone.
- Insert petiole into moist African violet mix or perlite at a 45-degree angle.
- Cover with dome. Place in bright, indirect light (no direct sun).
- In 4–6 weeks, tiny plantlets emerge at the petiole base.
- When plantlets have 2–3 leaves, gently separate and pot individually.
Common challenge: Watering the leaf crown can cause rot—water the soil only. Low humidity may dry the leaf before roots form; a dome helps maintain moisture.
Troubleshooting Leaf Propagation
- Leaf turns yellow/mushy: Overwatering or insufficient callusing. Solution: Start over; allow cut ends to dry 24–48 hours; use a well-draining medium.
- Leaf shrivels but doesn’t rot: Underwatering or low humidity. Solution: Lightly mist medium (not leaf); increase humidity with a dome.
- No plantlets after several months: Insufficient light, cool temperatures, or leaf maturity issue. Solution: Relocate to brighter spot; ensure temperatures stay above 65°F (18°C); use mature leaves next time.
- Plantlets form but struggle after separation: Transplanted too early. Solution: Wait until plantlets have visible roots and 2+ true leaves.
Illustrative scenario: In hot, dry climates, adjusting the propagation medium to improve drainage (e.g., perlite) and reducing watering frequency can significantly improve outcomes for moisture-sensitive plants like snake plant.
Division: Instant Gratification for Clumping Plants
Division offers immediate results—no waiting for roots to form. You’re separating an established plant into multiple independent specimens. This method works for plants that naturally produce offsets, rhizomes, tubers, or dense clumps. It’s also the most reliable way to preserve specific traits like variegation in certain plants.
Why Division Works: Natural Reproduction Strategy
Many plants evolved to spread via underground stems (rhizomes, corms) or surface runners. In nature, environmental factors separate these sections, allowing new plants to establish. Division mimics this process. Unlike cuttings, divided sections already have roots, stems, and leaves—making them immediately self-sufficient. This method also rejuvenates overcrowded specimens when performed thoughtfully.
Tools and Timing Essentials
- Best time: Early spring, as the plant exits dormancy and enters active growth. This gives divisions maximum time to establish.
- Tools: Sharp knife or pruners, sterilized. Garden fork or chopstick for teasing roots. New pots with drainage holes. Fresh potting mix.
- Parent plant readiness: Roots circling the pot bottom, slowed growth, or offsets crowding the mother plant. Gently remove the plant—if roots are densely matted with little soil visible, it may benefit from division.
Step-by-Step Division Guide
Step 1: Remove and Inspect
Water the plant 1 day before dividing to reduce root stress. Gently tip the pot sideways, supporting the base. Tap the pot rim to loosen. Slide the root ball out. Never pull the plant by its stems. Examine the root structure:
– Rhizomes (snake plant, ZZ): Thick, horizontal underground stems. Look for natural segments with growth points (“eyes”).
– Clumping roots (spider plant, peace lily): Dense mass of fibrous roots. Identify natural separations between stems.
– Offsets/pups (aloe, haworthia): Small plantlets attached at the base. Look for visible roots on the pup.
Step 2: Separate Gently
– For loose clumps (spider plant): Use fingers to tease sections apart at natural divisions. Work slowly to minimize root damage.
– For tight rhizomes (snake plant): Sterilize a sharp knife. Cut rhizomes into sections, ensuring each has at least one healthy leaf fan and growth point. Let cuts callus 24 hours before potting.
– For pups (aloe): Slide a knife between pup and mother plant, cutting the connecting root. Preserve as many pup roots as possible.
Step 3: Prepare Divisions
Trim any damaged, mushy, or excessively long roots with sterilized scissors. Remove dead or yellowing leaves. For rhizome sections (snake plant), dust cut ends with cinnamon (natural fungicide) or rooting hormone if desired.
Step 4: Pot Immediately
Fill new pots with appropriate mix:
– Snake plant, ZZ: Cactus/succulent mix or 2:1 potting soil:perlite
– Peace lily, spider plant: Standard potting mix with extra perlite
– Aloe: Fast-draining cactus mix
Position divisions at the same depth they grew originally. Fill gaps with mix. Press gently. Water thoroughly until water runs from drainage holes. Exception: Snake plant and ZZ divisions may benefit from waiting 3–5 days before first watering to allow cut surfaces to seal.
Step 5: Aftercare
Place divisions in bright, indirect light. Avoid direct sun for 1–2 weeks. Water when top inch of soil feels dry. Do not fertilize for 4–6 weeks. New growth indicates successful establishment.
Plant-Specific Division Guidance
Snake Plant (Sansevieria trifasciata)
– Method: Rhizome division (best for preserving variegation) or leaf cuttings (may revert to green).
– Key insight: Each rhizome segment must have a visible growth point (looks like a tiny bump). Without it, the segment won’t sprout. Divide in spring. Let cut rhizomes callus 24 hours. Pot in gritty mix. Water sparingly.
– Why division is preferred for variegation: Guarantees offspring match the parent’s coloring. Faster results than leaf cuttings.
Spider Plant (Chlorophytum comosum)
– Method: Separate plantlets (spiderettes) with visible roots.
– Key insight: Plantlets can root while still attached. Place a small pot of soil under a plantlet, pin it down, and wait for roots (2–3 weeks). Then snip the stolon. Alternatively, snip plantlets with a bit of stolon and root directly.
– Tip: Spider plants often produce more plantlets when slightly rootbound. Avoid repotting the mother plant too frequently.
Peace Lily (Spathiphyllum)
– Method: Divide dense clumps.
– Key insight: Peace lilies signal readiness by producing fewer flowers and crowded foliage. Gently pull apart sections with at least 3–4 leaves and a healthy root mass. Use a knife only if roots are fused. Pot in rich, moist mix. Keep consistently damp (not soggy) and humid. New growth appears in weeks.
– Caution: Divisions with fewer than 3 leaves may struggle. Prioritize plant health over quantity.
ZZ Plant (Zamioculcas zamiifolia)
– Method: Rhizome (tuber) division.
– Key insight: ZZ rhizomes resemble thick, potato-like structures. Each segment must have at least one “eye” (growth point). Sterilize knife. Cut rhizomes. Let callus 24–48 hours. Pot in very well-draining mix. Wait before first watering. Overwatering risks rhizome rot.
– Alternative: Leaflet propagation is possible but slow.
Aloe Vera
– Method: Separate offsets (pups) with roots.
– Key insight: Wait until pups are about 1/3 the size of the mother plant and have their own roots. Gently expose the connecting root. Cut cleanly. Let pup callus 2–3 days in shade. Pot in cactus mix. Wait before light watering.
– Common challenge: Separating pups too small (no roots) or watering immediately after potting.
Troubleshooting Division
- Divisions wilt after potting: Transplant shock. Solution: Place in shadier spot for 1 week; ensure soil is moist but not wet; avoid fertilizer.
- Rhizome sections show decay: Overwatering before cuts heal. Solution: For snake plant/ZZ, wait several days before first watering; use gritty mix; ensure pot drainage.
- No new growth after weeks: Division too small, insufficient light, or timing. Solution: Ensure divisions have growth points; move to brighter location; be patient—some plants grow slowly.
- Mother plant declines after division: Over-divided or root damage. Solution: Never remove more than 1/3 of the plant at once; handle roots gently; water mother plant well after repotting.
Illustrative scenario: When dividing plants during warmer months, providing temporary shade and increased humidity can help divisions recover from the stress of separation.
Advanced Techniques: Air Layering and Beyond
When stem cuttings are challenging or the plant is particularly valued, air layering offers a high-reliability alternative. This method encourages roots to form while the stem remains attached to the parent plant, ensuring continuous moisture and nutrient supply during root development. Ideal for woody, slow-rooting, or top-heavy plants like fiddle leaf figs, rubber plants, or dracaenas with bare stems.
Air Layering: A Supported Propagation Method
Why it works: By wounding the stem and enclosing moist medium around the wound, you create ideal conditions for root initiation without severing the stem’s connection to the parent. The parent plant sustains the propagule until roots are robust.
Materials Needed:
– Sharp, sterilized knife or razor blade
– Toothpicks or small matchstick
– Sphagnum moss (soaked, then squeezed damp—not dripping)
– Clear plastic wrap (6×6 inch piece)
– Twist ties or string
– Optional: rooting hormone powder
Step-by-Step Air Layering (Fiddle Leaf Fig Example):
Step 1: Select the Stem Section
Choose a healthy, mature stem 12–18 inches below the canopy. Avoid sections with flowers or damage. Identify a node.
Step 2: Make the Wound
– Method A (Ring Barking): Make two parallel horizontal cuts 1 inch apart around the stem. Connect cuts with a vertical slice. Peel away the ring of bark and cambium layer to expose the inner wood. This concentrates growth hormones at the wound site.
– Method B (Upward Slant Cut): Make a single upward-angled cut 1–1.5 inches long, 1/3 into the stem. Insert a toothpick to keep the wound open. Less invasive; often preferred for beginners.
Step 3: Apply Rooting Hormone (Optional)
Dust the wounded area with rooting hormone powder if desired. This may support root initiation for slower-rooting plants.
Step 4: Pack with Moss
Take a handful of damp sphagnum moss. Pack it tightly around the wound, forming a ball.
Step 5: Enclose and Secure
Wrap clear plastic wrap around the moss ball, sealing top and bottom tightly with twist ties. Ensure no moss is exposed. The plastic creates a humid microclimate. Tip: Wrap a layer of aluminum foil over the plastic to block light (roots often prefer darkness) and prevent algae growth.
Step 6: Wait and Monitor
Place the plant in its usual bright, indirect light. Check every 1–2 weeks by gently unwrapping the top. When white roots fill the moss (typically 6–12 weeks for fiddle leaf fig), it’s ready.
Step 7: Sever and Pot
Below the rooted section, cut the stem cleanly with sterilized pruners. Carefully remove plastic wrap. Gently untangle roots if possible. Pot the new plant in well-draining mix. Keep soil consistently moist and humidity elevated for the first few weeks. The parent plant will often sprout new growth below the cut site.
Plants Well-Suited for Air Layering:
– Fiddle Leaf Fig (Ficus lyrata)
– Rubber Plant (Ficus elastica)
– Dracaena (Dragon Tree)
– Schefflera (Umbrella Tree)
– Croton
– Dieffenbachia (Dumb Cane)
Why Air Layering Supports Success for Woody Plants:
Woody stems often have lower natural concentrations of rooting hormones and thicker bark that impedes moisture uptake. Cuttings may rot before roots form. Air layering maintains vascular connection until roots are established, making it a highly reliable method when performed carefully.
Other Methods Briefly Explored
Water Layering (for Pothos/Philodendron):
Bend a long vine down to a jar of water. Submerge a node while the vine remains attached. Roots form rapidly. Once rooted, snip below the roots. A low-risk way to propagate without cutting the parent vine prematurely.
Offsets and Pups (Beyond Division):
Some plants produce plantlets on flower stalks (e.g., Kalanchoe daigremontiana—”Mother of Thousands”). These drop off naturally. Simply place plantlets on moist soil; they root where they land. Minimal intervention needed.
Tuber and Corm Propagation (Caladium, Cyclamen):
During dormancy, lift tubers. Divide with a sterilized knife, ensuring each section has an “eye.” Dust cuts with sulfur powder if desired. Store in peat moss until planting season. Requires precise timing and storage conditions—best for experienced growers.
The Indoor Propagation Calendar: Month-by-Month Guidance
Propagation aligns beautifully with natural cycles. This calendar adapts to Northern Hemisphere seasons. Southern Hemisphere readers: shift months by six (e.g., “March” becomes “September”). Equatorial growers: focus on dry vs. rainy seasons; drier months often reduce fungal risks.
| Month | Biological Context | Best Plants to Propagate | Methods to Prioritize | Key Considerations |
|---|---|---|---|---|
| January | Deep dormancy for many. Low light, cooler temps. | ZZ Plant, Snake Plant (division), Pothos (with supplemental light) | Division, Stem cuttings (with grow lights) | Use grow lights 12+ hrs/day if available. Keep temps above 65°F (18°C). Water propagation offers visual feedback. Patience is essential; growth may be slow. |
| February | Days lengthening. Plants sense impending growth. | Spider Plant (pups), Chinese Evergreen, Pothos, Philodendron | Division, Stem cuttings | Ideal time to divide spider plants before spring growth. Start stem cuttings; roots may develop slowly but establish before active growth. |
| March | Prime propagation window. Dormancy breaks. Growth processes increase. | Monstera, Fiddle Leaf Fig, Rubber Plant, Peace Lily, Ferns | Stem cuttings, Division, Air Layering | Highest potential success rates. Take cuttings before new spring leaves harden. Divide peace lilies as new growth emerges. Begin air layering woody plants. |
| April | Rapid growth phase. High energy reserves. | All vining plants (Pothos, Philodendron, Ivy), Begonias, Peperomia | Stem cuttings, Leaf cuttings | Excellent for water propagation—roots visible quickly. Start begonia leaf sections. Ideal humidity for soil propagation. |
| May | Peak growth. Long days, warm temps. | Fiddle Leaf Fig, Rubber Plant, Dracaena, Calathea | Air Layering, Stem cuttings | Best month for air layering woody plants. High humidity supports delicate divisions. Avoid midday sun on propagules. |
| June | Active growth continues. Risk of heat stress. | Spider Plant (abundant pups), String of Hearts, Hoya | Division, Stem cuttings | Propagate spider plant pups before they drain mother plant energy. String of Hearts roots easily in water. Hoyas benefit from warm temps. |
| July | Heat peaks. Some plants slow growth. | Succulents (Echeveria offsets), Aloe pups, Snake Plant | Division, Offset separation | Propagate succulents early month if possible. Ensure excellent airflow to prevent mold. Water propagation may require more frequent changes in heat. |
| August | Late summer growth. Prep for fall. | Pothos, Philodendron, ZZ Plant | Stem cuttings, Division | Take cuttings to grow stock before light decreases. Divide ZZ plants showing crowded rhizomes. Warm temps support water propagation. |
| September | Growth slows. Days shorten. | Snake Plant, ZZ Plant, Chinese Evergreen | Division | Final window for high-success division before dormancy. Avoid stem cuttings—they may not root before winter. Focus on plants that propagate well in cooler temps. |
| October | Entering dormancy. Energy shifts downward. | Snake Plant (division only) | Division | Only propagate via division. Stem cuttings unlikely to root before winter. Prepare parent plants for rest—reduce watering. |
| November | Dormancy deepens. Low light. | None recommended | Maintenance only | Focus on plant health: clean leaves, check pests, adjust watering. Avoid propagation. Energy better spent on parent plant care. |
| December | Shortest days. Lowest energy. | None recommended | Planning and tool prep | Sterilize tools. Research next year’s projects. Order supplies. Enjoy existing plants. Propagating now often leads to frustration—respect the rest period. |
Adapting the Calendar to Your Environment
- Low-Light Apartments: Focus propagation efforts March–June. Use supplemental LED grow lights (full-spectrum, 12–14 hours/day) to extend the effective season. Prioritize low-light tolerant plants: ZZ, snake plant, pothos.
- Humid Climates (Florida, Southeast Asia): Reduce watering frequency for soil propagation. Increase airflow with a small fan on low setting to prevent mold. Propagate year-round but avoid peak rainy seasons.
- Arid Climates (Southwest US, Australia): Boost humidity: use propagation domes, group plants, place trays on pebble-filled water saucers. Mist cuttings lightly if needed. Cover water propagation jars loosely to reduce evaporation.
- Grow Light Users: You control the light cycle. Maintain 14 hours of light to simulate “spring/summer” conditions year-round. Ideal for rare or slow-growing plants needing consistent environments.
Seasonal Troubleshooting Quick Reference
- Spring Challenges (March–May): Often due to cold drafts or inconsistent moisture. Keep propagules away from open windows. Use room-temperature water.
- Summer Challenges (June–August): Heat stress or fungal growth. Move away from intense sun. Increase airflow. Refresh water propagation every 2–3 days.
- Fall Challenges (September–November): Insufficient light as days shorten. Relocate to brightest window. Add grow light if attempting late propagation.
- Winter Attempt Challenges (December–February): Biological dormancy makes propagation difficult for most plants. Save energy—wait until March. Exceptions: snake plant/ZZ division with grow lights.
Illustrative adaptation: Growers in regions with limited natural light often use dedicated propagation shelves under LED grow lights from late winter through fall, achieving consistent results by creating a controlled environment that bridges seasonal gaps.
Solving Propagation Problems: A Diagnostic Guide
Even careful propagators encounter setbacks. This section transforms observation into actionable solutions. Most issues stem from moisture balance, light conditions, or timing—not “bad luck.” Approach challenges with curiosity.
Root Rot: Addressing Moisture Imbalance
Symptoms: Stem base turns brown/black, feels soft; water smells unpleasant; roots appear slimy and brown instead of firm and white.
Common Contributing Factors:
– Water propagation: Infrequent water changes allow microbial activity.
– Soil propagation: Overwatering combined with poor drainage limits oxygen.
– Environmental factor: Cool temperatures slow root development, prolonging vulnerability.
Step-by-Step Response:
1. Isolate the affected propagule to protect others.
2. Remove from medium. Rinse gently under lukewarm water.
3. Sterilize tools. With sharp scissors dipped in alcohol, cut away all affected tissue until only firm, healthy stem remains. Cut just above the last healthy node.
4. Optional disinfect: Soak the healthy cutting end in diluted hydrogen peroxide solution (1 part 3% peroxide to 2 parts water) for a few minutes. Rinse.
5. Restart: Place in fresh water or sterile perlite. Refresh water daily for the first week.
6. Prevent recurrence: For water propagation, refresh water frequently. For soil, ensure excellent drainage and avoid overwatering.
When to Move On: If decay has reached above the lowest node, the cutting cannot regenerate roots. Compost it. Learn: next time, refresh water more often or use a better-draining medium.
No Root Development After Several Weeks
Symptoms: Cutting remains green but shows no root growth; leaves may yellow slowly.
Common Contributing Factors:
– Primary: Insufficient light or temperatures below 65°F (18°C).
– Secondary: Propagating during dormancy; cutting taken from a flowering stem; node not included.
– Tertiary: Stagnant water limiting oxygen in water propagation.
Response Strategy:
1. Verify node presence. If no node is present, rooting is biologically unlikely.
2. Optimize environment: Move to the brightest indirect spot available (east window ideal). Place container on a warm surface.
3. Refresh medium: For water, change to fresh room-temp water. For soil, gently check if medium is compacted; consider repotting in fresh perlite mix.
4. Patience assessment: Wait 1–2 more weeks. If still no roots and the cutting shows decline, it may have exhausted its energy reserves. Start anew with a healthier stem section.
Prevention Insight:
– Propagate during active growth seasons (March–June) when possible.
– Monitor conditions near propagules. Target consistent warmth (70–75°F / 21–24°C) and adequate humidity.
– For slower-rooting plants (fiddle leaf fig), consider rooting hormone and gentle bottom warmth.
Mold and Fungus: Managing Surface Growth
Symptoms: White, fuzzy patches on soil surface, moss, or cutting stems; sometimes gray/black spots.
Common Contributing Factors:
– Soil/moss propagation: Overwatering + poor airflow + high humidity without ventilation.
– Water propagation: Organic debris in water feeding microbes.
– Universal: Contaminated tools or medium.
Response Protocol:
1. Increase airflow: Remove propagation dome for several hours daily. Place a small fan nearby on lowest setting (not blowing directly on plants).
2. Surface treatment: For soil/moss, sprinkle cinnamon powder (natural fungicide) over affected areas. For water propagation, refresh water immediately.
3. Clean affected areas: Use a cotton swab dipped in diluted hydrogen peroxide (1:1 with water) to gently wipe mold from stems if needed.
4. Adjust moisture: Allow soil surface to dry slightly before re-covering. For water, change immediately.
Important Note: Light surface mold on soil is often harmless saprophytic fungus feeding on organic matter. Act only if it spreads to the cutting stem. True problematic mold appears slimy or black and requires prompt attention.
Leaf Yellowing and Drop
Symptoms: Lower leaves turn yellow, then brown; may detach easily. Upper leaves remain green.
Common Contributing Factors:
– Normal: Some yellowing of lowest leaves is natural as energy redirects to root growth.
– Problematic: Moisture imbalance (over/under-watering) or environmental stress. In water propagation, yellowing may precede decay.
Diagnostic Questions:
– Is the stem still firm? → Likely normal leaf sacrifice. Remove yellow leaf; continue care.
– Is the stem soft at the base? → Possible decay beginning. Follow rot response protocol.
– Is the soil soggy? → Overwatering likely. Allow to dry partially; improve drainage next time.
– Is the soil bone dry? → Underwatering likely. Water thoroughly; check daily.
Prevention: For soil propagation, use the “finger test” (moist ½ inch down). For water propagation, ensure only the node is submerged—leaves touching water invite issues.
Transplant Shock After Potting
Symptoms: New plant wilts, leaves curl or droop within 1–3 days of potting; may partially recover then decline.
Common Contributing Factors:
– Roots disturbed during transplant.
– Medium too dense or overly wet.
– Sudden exposure to brighter light or lower humidity.
– Fertilizer applied too soon.
Recovery Approach:
1. Provide shade: Move to lower-light area for 7–10 days.
2. Humidity support: Cover loosely with a vented plastic bag for a few days.
3. Moisture check: If soil is soggy, gently lift plant, wrap roots in paper towel to absorb excess moisture, repot in drier mix. If dry, water lightly.
4. No fertilizer: Wait 6 weeks minimum.
5. Minimize disturbance: Avoid touching or moving the plant. Most recover in 2–3 weeks if roots were healthy at transplant.
Prevention Insight:
– Transplant only when roots are robust (1+ inch with branching).
– Use appropriately sized pots (1–2 inches wider than root ball).
– Maintain similar light/humidity conditions for one week after potting before moving to permanent spot.
The “False Positive” Trap
Scenario: Cutting in water shows tiny white root nubs after 10 days. You transplant to soil. Within a week, it wilts.
Why It Happens: Initial nubs are root primordia—not fully functional roots. They lack the fine root hairs needed for water uptake. Transplanting too early severs these delicate structures. True readiness requires visible branching and sufficient length (1+ inches).
Solution: Wait. Observe daily. When roots resemble miniature mature roots (with fine “hairs”), transplant. For soil-propagated cuttings, gentle resistance when tugged after 3 weeks suggests anchoring roots.
Building a Propagation Journal
Track observations to refine your intuition. Note:
– Plant type and parent plant health
– Date taken and method
– Medium used
– Environmental conditions (light source, approximate temp, humidity observations)
– Observations (day roots appeared, issues encountered)
– Outcome (success/failure + suspected reason)
Patterns emerge: “My north window works for pothos but not monstera,” or “I notice mold more in July—need better airflow.” This transforms isolated incidents into personalized knowledge. One grower discovered their tap water’s mineral content caused residue; switching to filtered water improved clarity. Your journal becomes a living reference tailored to your space and habits.
Your Questions, Answered
Q: Can I propagate a plant with only one leaf and no stem?
A: It depends entirely on the plant species. Snake plant leaf sections can regenerate (though slowly). African violet leaves with petioles can form plantlets. However, a single pothos or monstera leaf without a node cannot root—it lacks the necessary tissue. Always verify species-specific requirements. When uncertain, include a node.
Q: Is tap water safe for water propagation?
A: For most municipal water, yes—with considerations. Chlorine dissipates if water sits uncovered for 24 hours. Chloramine (used in some areas) does not dissipate easily; filtered water or a pinch of activated charcoal in the jar may help. Hard water may cause mineral deposits on jars but rarely harms cuttings directly. If cuttings consistently struggle, try distilled or rainwater.
Q: How do I know if my cutting has “taken” after potting?
A: Look for these signs: 1) New leaf growth (not just unfurling existing leaves), 2) Gentle resistance when tugged after 3–4 weeks, 3) Roots emerging from drainage holes. Avoid checking too early—disturbing new roots can delay establishment. Allow 4–6 weeks of undisturbed growth post-potting.
Q: Can I propagate plants in winter?
A: Limited success is possible with adjustments. Snake plant and ZZ divisions may work year-round with supplemental light. Pothos cuttings might root slowly in water near a bright window. However, biological dormancy makes spring the most reliable window for most plants. Root development processes are generally less active in cooler temperatures. For consistent results, waiting until spring is often worthwhile.
Q: Why do my monstera cuttings develop roots but no new leaves?
A: This is typically normal. Energy is prioritized to establish roots before producing leaves—a natural survival strategy. Ensure the cutting has adequate bright, indirect light and consistent moisture. New leaf growth usually emerges several weeks after robust roots form. If no leaf appears after several months, review light levels or medium nutrition.
Q: Is rooting hormone necessary?
A: Not necessary for easy-rooting plants (pothos, spider plant, philodendron). It may support success for challenging plants (fiddle leaf fig, rubber plant, woody stems) by concentrating growth hormones at the cut site. Natural alternatives exist: willow water (steep willow twigs in water 24 hours) contains natural compounds; honey has antibacterial properties but minimal rooting effect. For beginners, mastering technique often matters more than additives.
Q: Can I propagate a variegated plant and keep the variegation?
A: For most variegated plants, division or air layering offers the most reliable way to preserve coloring. Variegation is often a genetic trait not consistently carried in leaf or stem tissue used for standard cuttings. Snake plant leaf cuttings typically produce solid green plantlets. Monstera albo stem cuttings may retain variegation if the node has variegated tissue, but results vary. For true-to-type variegated offspring, division is the most dependable method.
Q: How long can a cutting stay in water before potting?
A: Ideally, pot when roots are 1–2 inches long with visible branching (usually 2–6 weeks). Leaving cuttings in water too long can cause roots to adapt specifically to aquatic conditions, potentially increasing adjustment time in soil. If delayed, refresh water weekly and avoid direct sun to prevent algae.
Q: My cutting has roots in water, but they struggle after potting. Why?
A: This common challenge often stems from two factors: 1) Transplanting before roots are robust enough, 2) Overwatering the new soil. Solution: Wait until roots are well-developed and branched. When potting, use a very well-draining mix (add extra perlite). Water lightly after potting, then wait until the top inch of soil is dry before watering again. Place in bright, indirect light—avoid low light which slows soil drying.
Q: Can I propagate from a flower stem?
A: Generally no. Flower stems (inflorescences) lack nodes with tissue capable of forming roots and shoots. They are reproductive structures designed to complete their cycle. Focus propagation efforts on vegetative stems (with leaves and nodes). Exception: Some plants like Kalanchoe produce plantlets directly on flower stalks—these can be potted.
Q: Is it better to propagate in water or soil?
A: Neither is universally superior—it depends on your goals and plant type. Water propagation offers visual feedback and suits beginners with easy plants (pothos, philodendron). Soil propagation creates roots adapted to soil immediately, potentially reducing adjustment time, but requires careful moisture management. For challenging plants, perlite or LECA offers a balanced middle ground. Experiment to discover what works best in your environment.
Q: How do I propagate a plant that’s declining?
A: Only attempt if the decline is due to correctable issues (e.g., overwatering) and healthy sections remain. Take cuttings from the healthiest part before further deterioration. Sterilize tools meticulously. Focus on preserving genetics, not necessarily saving the original plant. If the plant shows signs of systemic disease (severe root rot, viral symptoms), propagation may spread the issue—discarding is often the responsible choice. Prevention through consistent care remains the most sustainable approach.
Conclusion: Your Propagation Journey Continues
Propagation is more than a technique—it’s a shift in perspective. You move from caring for plants to collaborating with their natural processes. You learn to read subtle cues: stem firmness, leaf hue, seasonal rhythms. This guide has provided a complete framework—the Propagation Success Cycle—to approach indoor plant propagation with informed confidence. Remember the three key principles: honor the node, align with biological timing, and master moisture balance. These concepts apply whether you’re propagating your first pothos cutting or refining techniques for rare specimens.
Recap: The Three Pillars of Propagation Success
- Preparation Sets the Foundation: Healthy parent plant + sterilized tools + thoughtful timing significantly influence outcomes. This phase is worth the attention.
- Method Matches Biology: Stem cuttings for vining plants, division for clumpers, air layering for woody specimens. Work with the plant’s natural strategy.
- Aftercare is Attentive Care: Monitor humidity, light, and moisture consistently. Patience is informed observation, not inaction.
The 24-Hour Rule: Your Next Small Step
Within the next 24 hours, take one manageable action:
– If you have a pothos, philodendron, or spider plant: Take one cutting or separate one pup. Place it in water on your windowsill.
– If you don’t have propagatable plants yet: Research one plant you’d enjoy growing. Bookmark this guide. Visit a nursery this weekend and select a healthy specimen with propagation potential.
– If you’ve faced setbacks before: Review the troubleshooting section. Identify one factor to adjust next time (e.g., refresh water more frequently, wait for spring).
This small action builds momentum. Doing creates confidence far more effectively than planning alone. Your first successful propagation often sparks deeper curiosity and connection.
The Bigger Picture: Why This Practice Matters
Every cutting you root reduces demand for commercially produced plants, often grown with resource-intensive practices. Every division shared with a friend strengthens community and spreads botanical knowledge. Propagation connects us to enduring human traditions of stewardship and sharing. It cultivates resilience—both in plants and in ourselves. When a cutting finally sprouts roots after weeks of patient care, you’ve witnessed life’s adaptability. You’ve participated in renewal. That quiet moment of growth on your windowsill is a gentle affirmation of patience in a hurried world, a sustainable choice, and a living legacy you can pass on.
Your indoor garden holds endless potential for growth and sharing. Move gently, observe closely, and trust the process. The roots are reaching.
Explore Our Complete Plant Care System:
The Ultimate Guide to Diagnosing Indoor Plant Problems | Mastering Humidity: A Room-by-Room Strategy for Tropical Plants | Sustainable Potting Mixes: DIY Recipes for Every Plant Type | Seasonal Plant Care Calendar: Month-by-Month Maintenance Guide | Watering Wisdom: How to Read Your Plant’s Thirst Cues | Building a Propagation Station: Budget-Friendly Setup Ideas | Rare Plant Propagation: Special Techniques for Collectors